Did you know that Americans lose an average of $1,300 annually due to spoiled food? As the wife of an enthusiastic angler, I’ve learned that vacuum sealing my catch is a game-changer for preserving freshness. To start, it’s important to prepare the fish properly before sealing. This involves cleaning, portioning, and drying the fillets to remove excess moisture, a step that’s essential for preventing freezer burn. By following a few simple steps, you can significantly prolong the shelf life of your fish. Let’s take a look at how to vacuum seal fish effectively, starting with the initial preparation stages that make all the difference.
Prepare the Fish
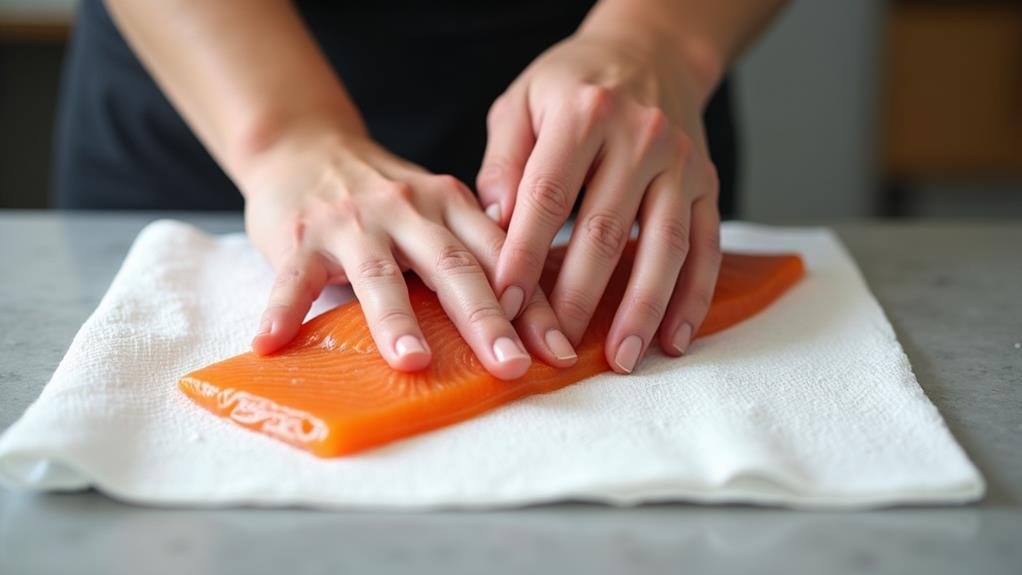
To prepare the fish for vacuum sealing, start by ensuring it is cleaned, gutted, and filleted. This initial step is essential for maintaining the freshness and quality of the fish. After filleting, it’s important to pat the fish dry with paper towels to remove excess moisture. This step is critical because excess moisture can lead to freezer burn and compromise the vacuum seal. Drying the fillets thoroughly with paper towels helps in absorbing any residual moisture, ensuring that the vacuum-sealed bag remains dry and free from moisture that could spoil the fish. Additionally, proper preparation enhances flavor retention and prevents spoilage, maximizing the value of your catch through effective preservation techniques.
If you want to enhance the flavor and texture of your fish, consider using the brining method before vacuum sealing. Brining involves soaking the fillets in a salt solution, which helps in preventing moisture from entering the fish cells and reduces the risk of freezer burn. However, if you choose not to brine, simply drying the fish is sufficient.
Pre-freezing the fish for a couple of hours can also be beneficial. Wrap the fillets in plastic wrap and freeze them until they start to harden. This helps maintain the shape and moisture content of the fish during the vacuum sealing process, preventing any moisture from being squeezed out by the vacuum.
Brine and Dry the Fillets
After verifying your fish fillets are clean, gutted, and properly dried, you may want to contemplate an additional step to enhance their flavor and texture: brining. However, it’s important to clarify that brining fish before freezing does not necessarily prevent the crystallization of flesh during the freezing process. This misconception is often clarified by the fact that freezing itself, particularly to a specific temperature, is what kills parasites and guarantees safety, not the brining process. Additionally, proper storage methods are essential for maintaining the freshness of your fish, as improper sealing can lead to spoilage or texture changes, especially if moisture is present. Foods not suitable for vacuum sealing can also serve as a guideline for what to avoid during the sealing process.
To brine your fish, you can dissolve ¼ cup of salt in 1 quart (approximately 2 pints) of cold water. This brine can help firm up the fish and add flavor, but it should be done after the fish has been thawed if it was previously frozen. Brining frozen fish fillets directly is not recommended, as the fish will not absorb the brine effectively.
Drying the fillets thoroughly is essential for maintaining quality during freezing. Excess moisture on the fillets can lead to issues during vacuum-sealing, such as compromising the heat seal. Thus, after brining, make sure to dry the fillets thoroughly to remove any excess moisture before proceeding with vacuum-sealing. This step guarantees that the fillets are sealed properly and helps in preserving the quality of the fish.
Flash Freeze the Fillets
When flash freezing fish fillets, it’s important to understand the process’s impact on moisture content and texture. Flash freezing creates small ice crystals that preserve the fish’s texture by preventing the rupture of cell walls, which helps maintain the fillets’ quality and integrity. This method is vital for preventing moisture loss and excess drip when the fish is later thawed, ensuring the fillets remain firm and fresh.
Pre-Freezing Process
Flash freezing your fish fillets before vacuum sealing is a vital step to maintain their moisture content and prevent the formation of large ice crystals that can lead to a mushy texture. This process helps in preserving the texture and quality of the fillets during the vacuum sealing process.
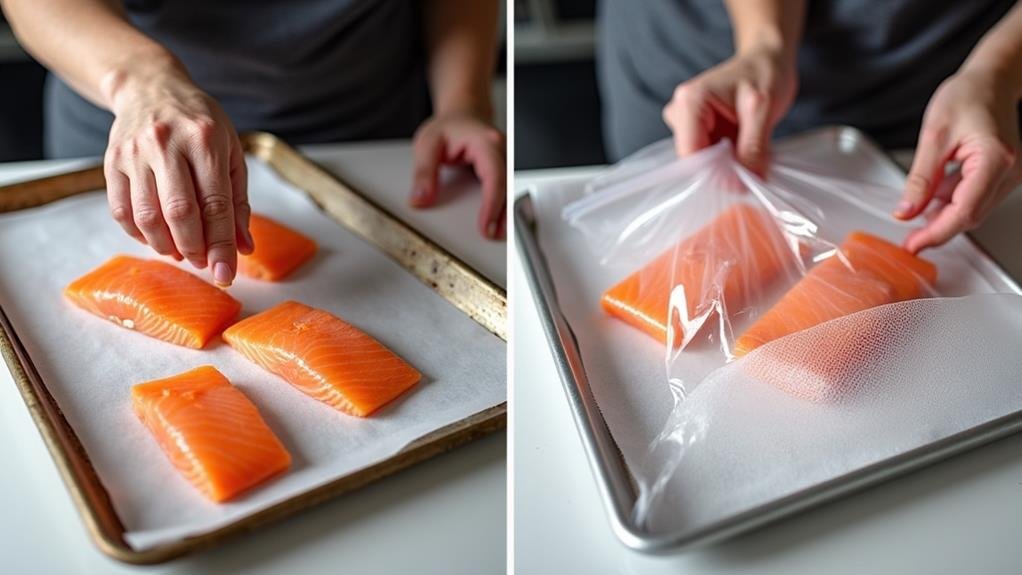
To achieve best results, it is recommended to freeze the fish first. You can place the fillets on a cookie sheet and flash freeze them for about 10-30 minutes in the freezer. This initial freezing makes the fillets firm, which prevents them from getting squished or losing their juices during the vacuum sealing process.
Before vacuum sealing, it is important to pat the fillets dry with paper towels to remove excess moisture. This step ensures that the sealing area remains dry, preventing any leaks or moisture from being squeezed out during the sealing process.
Wrapping the fillets in plastic wrap and freezing them for a short period is not necessary; instead, flash freezing them directly is sufficient. This method helps maintain the integrity of the fish without the need for additional wrapping.
Vacuum sealing without pre-freezing can lead to moisture loss and compromise the quality of the fish fillets. By freezing the fish first, you guarantee that the vacuum sealing process is efficient in removing oxygen and moisture, thereby extending the shelf life of your catch.
Moisture Control**
To maintain the quality and texture of your fish fillets, controlling moisture is key. When it comes to vacuum sealing fish, the pre-freezing process is essential for preserving the freshness and integrity of the fillets.
Flash Freezing the Fillets
Flash freezing your fish fillets before vacuum sealing is a crucial step in moisture control. Here’s why it’s important:
- Prevents Moisture Loss: Freezing the fillets before vacuum sealing helps prevent moisture from being expelled during the sealing process. This ensures that the fillets retain their juices and texture.
- Retains Moisture: Flash freezing for about 10 minutes to an hour helps lock in the moisture within the fillets, preventing it from escaping during the vacuum sealing process.
- Avoids Crystallization: Pre-freezing the fillets also helps prevent the formation of ice crystals that can damage the texture of the fish. This step is essential for maintaining the freshness and quality of your catch.
Vacuum Seal the Fish
When it comes to vacuum sealing fish, the process begins with pre-freezing the fish for about 1-2 hours to help retain its moisture and form. This step is important because vacuum sealing fish effectively preserves freshness and extends its shelf life, making it a safer option for long-term storage enhances food safety. Next, I need to remove excess moisture from the fish to ensure a tight seal, which can be done by drying the fillets thoroughly with paper towels. Finally, I must seal the package, making sure the area where the seal will be is completely dry to prevent any failure of the seal.
Pre-Freezing Fish
Before vacuum sealing your fish, it’s crucial to pre-freeze it for about 1-2 hours. This step is vital for retaining the moisture and form of the fish, making sure it stays fresh for a longer period.
Pre-freezing fish helps in several ways:
- Maintains Texture and Quality: Freezing the fish slightly before vacuum sealing helps preserve its texture and quality during storage. This prevents the fish from losing its natural juices and form.
- Prevents Air Contamination: By pre-freezing, you make it easier to seal the fish without any air pockets, which is important for preventing air contamination that can lead to freezer burn and spoilage.
- Locks in Freshness: Pre-freezing and then vacuum sealing the fish immediately after helps lock in the freshness and prevent freezer burn, extending the shelf life of the fish to 1-2 years.
During the pre-freezing process, it’s also crucial to make sure the fish is dry. Use a paper towel to dry the fillets thoroughly, especially if you’ve brined them, to remove excess moisture. This helps in creating a tighter seal when you vacuum seal the fish, making sure that your catch stays fresh and flavorful for months to come.
Removing Excess Moisture
To secure your fish stays fresh, you need to dry the fillets thoroughly using paper towels. Here’s why this is important:
Why Dry Fillets?
| Reason | Explanation |
|---|---|
| Prevents Freezer Burn | Excess moisture can lead to freezer burn, which affects the texture and flavor of the fish. |
| Guarantees Tight Seal | Properly dried fish guarantees a tight seal, preventing air from entering the package and spoiling the fish. |
| Eases Sealing Process | Moisture on fillets can cause the vacuum sealer to struggle with sealing the bag properly. Drying the fillets makes the sealing process smoother. |
| Maintains Quality | Removing excess moisture before vacuum sealing helps maintain the quality and freshness of the fish. |
When preparing your fish, place paper towels at the top 2-3 inches of the bag to absorb any moisture. This extra precaution helps in achieving a strong, air-tight seal. By doing so, you secure that your vacuum-sealed fish remains fresh for up to two years without any spoilage.
Sealing the Package
To make sure your fish is properly vacuum-sealed, it’s important to follow a few key steps. Here are some essential points to keep in mind during the sealing process:
Key Steps for Sealing the Package
1. Confirm the Fish is Completely Dry
Before vacuum sealing, it’s crucial to confirm the fish is completely dry. Pat the fish fillets with paper towels to remove any excess moisture. This step is vital because moisture can interfere with the sealing process and lead to a weak seal or even prevent the vacuum sealer from working effectively.
2. Use the Appropriate Vacuum Sealer Settings
Use a vacuum sealer with suitable settings to remove air from the package effectively. If your vacuum sealer has a moist food setting, use it to handle fish and other moist foods. This setting aids in absorbing any remaining moisture and ensures a better seal.
3. Avoid Overcrowding and Pre-Freeze if Needed
Do not overcrowd the vacuum-sealed bags, as this can make it challenging to keep air and moisture out. If the fish contains high levels of moisture, consider freezing it overnight on a cookie sheet before vacuum sealing. This pre-freezing step helps in reducing the moisture content, making the sealing process easier and more efficient.
Label and Store the Bags
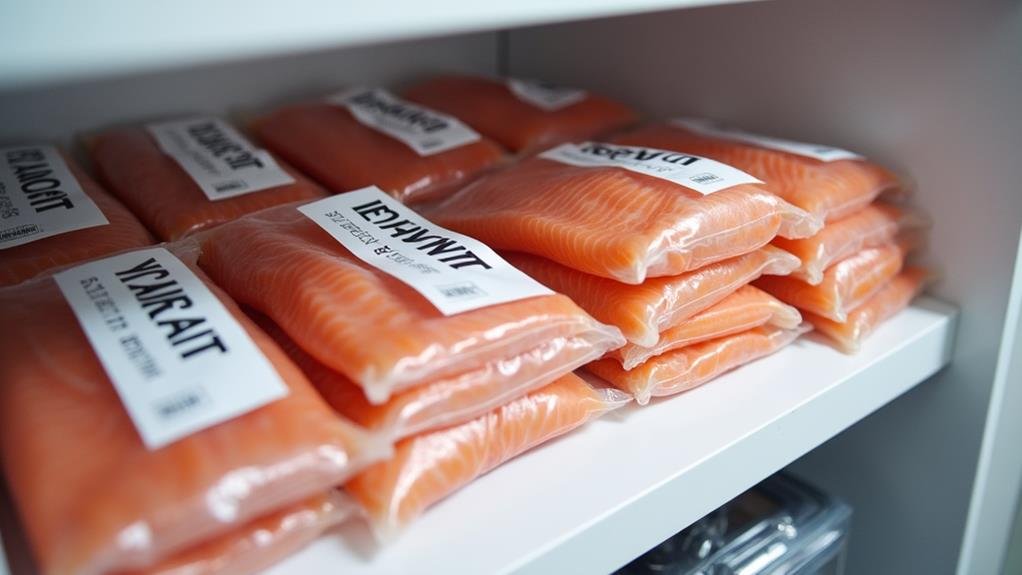
Once you’ve vacuum-sealed your fish, labeling each bag is important for easy identification and maintaining the freshness of your catch. Labeling each vacuum-sealed bag with the fish species and the date of sealing is vital. This helps you keep track of the freshness and type of fish stored, making sure you use them in a timely manner to preserve their shelf life.
Proper labeling also aids in organizing your frozen fish. Clear labels help you rotate your fish stock efficiently, making sure you use the oldest ones first. This method, often referred to as “first in, first out,” prevents older fish from being overlooked and reduces the risk of freezer burn.
Storing the vacuum-sealed bags in an organized manner in the freezer maximizes space and prevents mix-ups. Before thawing, always check the labels to confirm you are using the correct type of fish for your meal preparation. This simple step can make a significant difference in maintaining the quality and freshness of your frozen fish, allowing them to last up to two years when properly stored. By labeling and storing the bags correctly, you can extend the shelf life of your catch and enjoy fresh, high-quality fish whenever you need it.
Thaw the Fish Properly**
When it comes to thawing your vacuum-sealed fish, the method you choose can greatly impact the texture and flavor of your catch. To preserve the quality of your fish, it is essential to thaw it properly.
Recommended Thawing Methods
Here are the best ways to thaw your vacuum-sealed fish:
- Refrigerator Thawing: This is the safest and most reliable method. Transfer the fish from the freezer to the refrigerator at least 24 hours before you plan to cook it. Puncture the vacuum packaging to introduce airflow and prevent bacterial growth. Place the fish on a plate or in a container to catch any drips, ensuring it stays cold and at a consistent temperature.
- Cold Water Thawing: If you’re in a hurry, you can thaw the fish in cold water. Remove the fish from its vacuum packaging, place it in a sealed plastic bag, and submerge it in a bowl of cold tap water. Change the water every 30 minutes to keep it cold. This method typically takes about 2-3 hours, depending on the size of the fish.
- Avoiding Room Temperature: Never thaw fish at room temperature or with hot water, as this can lead to bacterial growth and compromise both safety and quality. Always keep the fish cold to prevent it from entering the “danger zone” temperatures where bacteria can grow.
Frequently Asked Questions
How to Vacuum Seal Fish Properly?
To vacuum seal fish properly, I first dry the fillets thoroughly to prevent moisture accumulation. Then, I pre-freeze them for a few hours to eliminate liquid, ensuring a tight seal when using my vacuum sealer.
How Long to Pre-Freeze Fish Before Vacuum Sealing?
When pre-freezing fish before vacuum sealing, I find that a short freeze of about one to two hours works best. This brief freeze helps retain moisture and prevents juices from being squeezed out during the sealing process, ensuring your catch stays fresh and flavorful.
How Do You Use a Vacuum Sealer Step by Step?
To use a vacuum sealer, I first choose the right bag, ensuring it’s the correct size and type for my items. I place the food in the bag, leaving about 2-3 inches of space at the top. Next, I align the open end of the bag with the sealer’s seal bar, close the lid firmly until it clicks, and press the seal button. Once the machine indicates the process is complete, I remove and label the bag for storage.
Can You Salt Fish Before Vacuum Sealing?
Yes, you can salt fish before vacuum sealing. In fact, salting helps preserve the fish by preventing pathogen growth and enhancing flavor. It’s a method that can make your fish last longer and stay juicier, similar to how vacuum sealing itself can save Americans $1,300 annually by reducing spoiled food.
Conclusion
Vacuum sealing your fish is a simple yet effective way to preserve your catch. You might worry that the process is too complex or that the fish will lose its flavor, but by following these steps, you’ll lock in the freshness and guarantee your fish remains flavorful for months to come. Imagine pulling out a perfectly sealed fillet from your freezer, its texture and taste intact, ready to be cooked into a delicious meal. With these steps, you’ll be enjoying your fresh catch all year round.