I used to think sous vide cooking was just restaurant wizardry, but it’s actually the most foolproof method for perfect meat at home. After years of hit-or-miss results with traditional methods, I’ve discovered that precise temperature control is what separates good meat from extraordinary meat. It’s not complicated once you understand the fundamentals of time, temperature, and technique. If you’ve ever wondered why chefs rely so heavily on this method, you’ll soon see why it’s worth mastering.
Set Up Your Sous Vide Station: Essential Equipment and Water Bath Preparation
How do you create restaurant-quality meat dishes at home?
I’ll tell you – it’s all about sous vide, and setting up your station correctly is where the magic begins.
The secret to restaurant-worthy meat isn’t fancy equipment—it’s mastering sous vide setup from the very beginning.
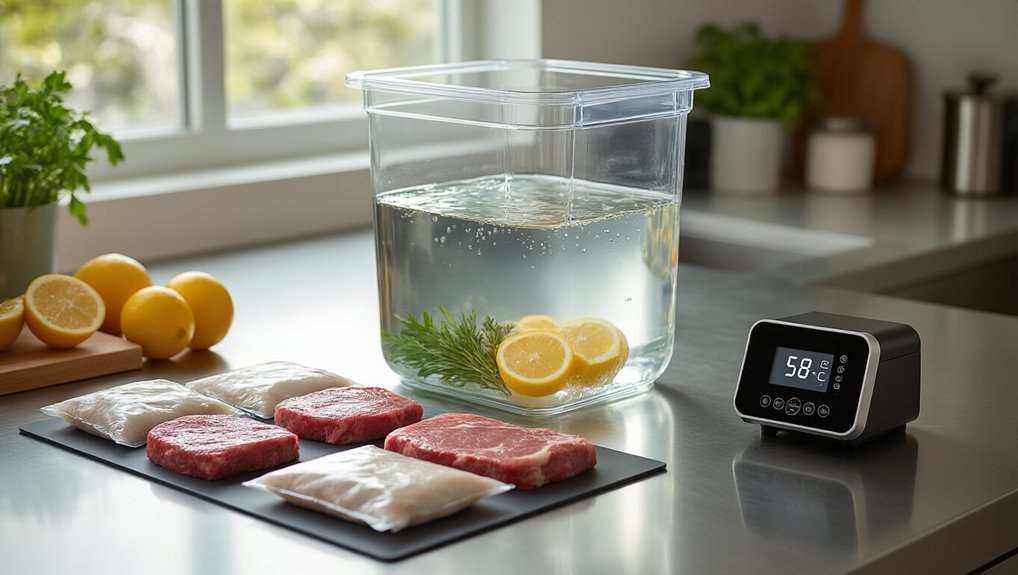
First, select a reliable immersion circulator – I’ve learned through equipment maintenance that quality matters here.
Choose a sturdy pot that’s large enough for your meat bags with room for water circulation.
When filling the bath, keep water between the minimum and maximum marks on your device.
For safety guidelines, always seal your meat in airtight bags – vacuum-sealed is best, but the water displacement method works too.
Clip those bags to prevent floating; submerged food cooks evenly.
Don’t rush the preheating! Regular calibration and maintenance ensure the immersion circulator and timer stay precise, reinforcing Temperature control.
I give my bath about 15 minutes to reach temperature before adding meat.
Trust me, verifying with an accurate thermometer makes all the difference.
Select and Prepare Meat Cuts for Maximum Sous Vide Results
Now that your sous vide station is primed and ready, let’s talk about what I consider the real star of the show – selecting the right cuts of meat.
Protein sourcing makes all the difference here.
I’ve found tough cuts like brisket and pork shoulder actually shine with longer baths – we’re talking 48-72 hours at 135°F to break down that stubborn connective tissue.
For premium cuts like filet mignon, I’m much more precise: just 1-2 hours at 130°F preserves that buttery texture.
Your butchery technique matters too.
I always generously salt and season before bagging, regardless of the cut.
And remember, wild game like venison?
That’s where sous vide really earns its keep – 24-48 hours at 131°F transforms that gamey flavor into something magical. Trust me on this.
This is where the science of Even heat distribution takes center stage, ensuring a uniform finish.
Master Temperature and Timing Charts for Different Meats and Doneness Levels

Why is temperature precision so critical to sous vide success?
It’s simple – water temperature directly determines your meat’s final doneness.
I’ve found that even a 2-degree difference can transform a perfectly tender brisket into something tough and disappointing.
The precision of temperature control is the unsung hero of sous vide mastery – those 2 degrees make all the difference.
Let me share some thermal maps I’ve developed through countless experiments.
Beef brisket needs 135°F for 48-72 hours to break down that stubborn collagen.
For pork shoulder, I go higher – 165°F for 24-36 hours gives that pull-apart texture we all crave.
On my doneness scale, leaner cuts require gentler treatment.
Chicken breast only needs 1-2 hours at 145°F, while steaks like filet mignon (130°F) and ribeye (129°F) benefit from 1-4 hours, depending on thickness, for that perfect medium-rare edge-to-edge.
By using an immersion circulator, you can consistently hold these target temperatures to achieve true edge-to-edge doneness.
Develop Restaurant-Worthy Flavor With Sous Vide Seasonings and Marinades
With temperature mastered, let’s talk flavor – because getting the perfect doneness is only half the battle. I’ve found that sous vide amplifies every seasoning choice you make, so be intentional! Vacuum sealing dramatically enhances flavor infusion by removing air and speeding up marination faster marination.
| Technique | Protein | Timing | Flavor Profile | My Take |
|---|---|---|---|---|
| Salt Crust | Beef | Pre-bag | Foundation | Essential first step |
| Herb Butter | Lamb | In-bag | Aromatic | My go-to for gamey cuts |
| Citrus Emulsions | Fish | Pre-sear | Bright, clean | Balance with olive oil! |
| Smoke Infusions | Pork | Post-bath | Complex depth | Worth the extra effort |
| Spice Rubs | Game | Pre-bag | Bold, earthy | Helps tame wild flavors |
Perfect the Finishing Sear: Techniques to Create a Professional Crust
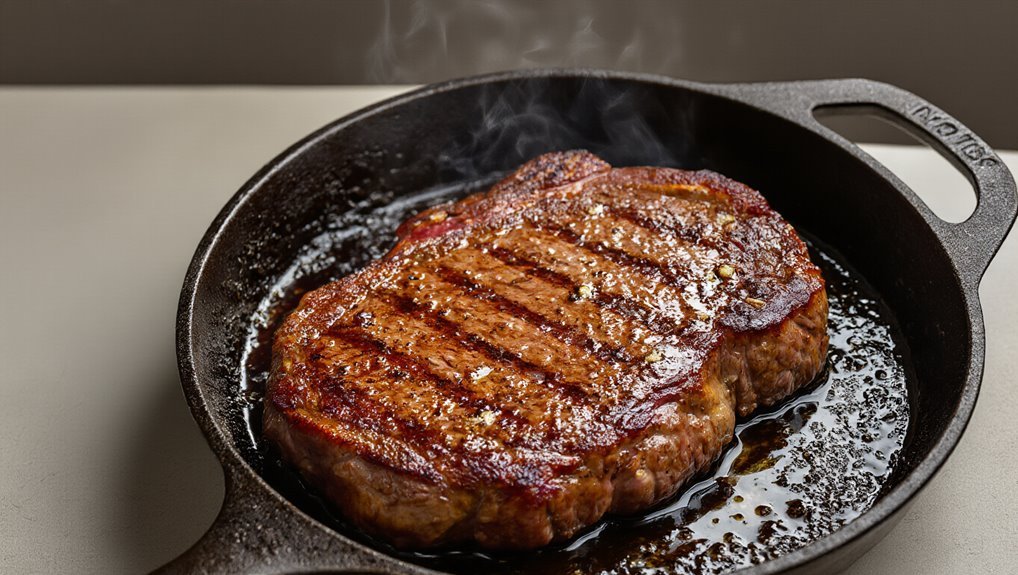
I’ve found that understanding crust chemistry is essential here: moisture is the enemy of browning, so I always pat my steak completely dry before searing.
For the perfect crust, I preheat my cast iron to about 550°F – honestly, it should be smoking hot!
The sear timing is critical; I go with about two minutes per side, which develops flavor without overcooking what I’ve carefully prepared sous vide.
In my experience, the reverse-sear approach works best.
Sometimes I’ll actually chill the meat slightly after sous vide cooking, which, weirdly enough, allows for a more uniform crust when I hit it with that intense heat.
Trust me, it’s worth the extra few minutes!
A solid grasp of Maillard reaction explains why a very hot, dry surface is essential for crust development.
Frequently Asked Questions
What Is the 3-3-3 Rule for Steaks?
I’ve never forgotten the 3-3-3 rule since mastering steaks: 3 minutes each side for searing, 3 minutes in a 300°F oven, and 3 minutes resting. Perfect temperature pairing for cooking times!
What Are Some Common Sous Vide Mistakes?
I’ve seen many home cooks mess up their sous vide by using inaccurate temperature readings, overcooking at fixed temps, skipping proper searing, improper vacuum sealing, and cooking vegetables with meats.
Do Michelin Restaurants Use Sous Vide?
Curious about culinary secrets? I’ve found many Michelin-starred kitchens do embrace sous vide for precision, though adoption varies based on chef philosophy and cost considerations rather than being universal practice.
Do Professional Chefs Use Sous Vide?
Yes, we professional chefs frequently use sous vide. It’s one of my essential chef practices for precision cooking. The equipment choice pays off through consistent results and workflow flexibility in demanding kitchens.