Did you know vacuum seal bags can triple your storage space while protecting clothes from dust, moisture, and pests? I’ve been using them for years to manage my seasonal wardrobe switch-outs. The key is having the right pump and technique—something most people get wrong at first. I’ll show you how to choose the perfect system and avoid the common mistakes that lead to those frustrating leaks and re-inflating bags.
How Vacuum Storage Bags Work: The Science Behind Compression
When you’re trying to maximize space in your closet or prepare for seasonal storage, vacuum seal bags are nothing short of miraculous. Just like herbs, limiting air exposure air exposure slows oxidation and preserves fabric integrity. I’ve been amazed by how these simple tools work—it’s all about air pressure!
As you pump air out, the external atmospheric pressure actually pushes against the bag’s material elasticity, compressing everything inside.
The science is pretty straightforward: these bags create an airtight environment using special polymers (usually polyethylene or nylon blends) that prevent air from sneaking back in.
When you use a pump—either electric or manual—you’re creating a pressure differential that can shrink your clothes by up to 80%!
What I love most is how the one-way valve technology maintains that compression over time. The durable materials hug your clothes tightly, making seasonal storage so much more efficient.
Choosing the Right Vacuum Bag Size and Type for Your Needs
When I’m planning my travels, I’ve learned that choosing the right size vacuum bags makes all the difference in fitting everything into my suitcase.
I always pack my travel-sized bags based on exactly where I’m going—small pouches for weekend trips and medium-sized ones for longer vacations where I’ll need more outfit options.
This practice mirrors the importance of vacuum sealing for keeping garments compact and protected.
Material quality matters too, and I’ve switched to thicker, more durable bags after experiencing the frustration of finding torn seals and reinflated clothes mid-journey.
Sizing for Travel Needs
Choosing the right vacuum bag size for your travel needs isn’t just about space-saving—it’s about practical packing that works with your specific trip.
For weekend getaways, I recommend smaller bags (under 20×15 inches) which are perfect for a few outfits and accessories.
The storage capacity of medium-sized options (around 24×16 inches) works for most vacations, handling average clothing bulkiness without wasting space.
If you’re planning an extended trip or need to pack winter gear, larger bags (over 28×20) are your best bet.
I’ve found that multi-size sets offer the most flexibility—you can mix and match based on what you’re bringing.
And remember, the bag itself shouldn’t add unnecessary weight. Travel-specific vacuum bags are designed to be lightweight while still maximizing your luggage space.
Material Durability Matters
Although many shoppers focus primarily on size, the material quality of your vacuum bags ultimately determines whether they’ll survive that overstuffed suitcase situation. I’ve learned through durability testing that multi-layered PA+PE materials really do outperform those cheaper, thin plastic options. When I’m packing heavier winter clothes, I always opt for bags with reinforced seams.
| Material Type | Material Strength | Best For | Typical Lifespan |
|---|---|---|---|
| PA+PE Multilayer | Very High | All Items | 3-5 years |
| TPU Coated | High | Moisture Protection | 2-4 years |
| Basic Plastic | Low | Light Items | 6-12 months |
| Reinforced Seam | Medium-High | Heavy Items | 2-3 years |
You’ll find that investing in quality bags with superior material strength actually saves money in the long run, as you won’t be replacing torn bags after every trip.
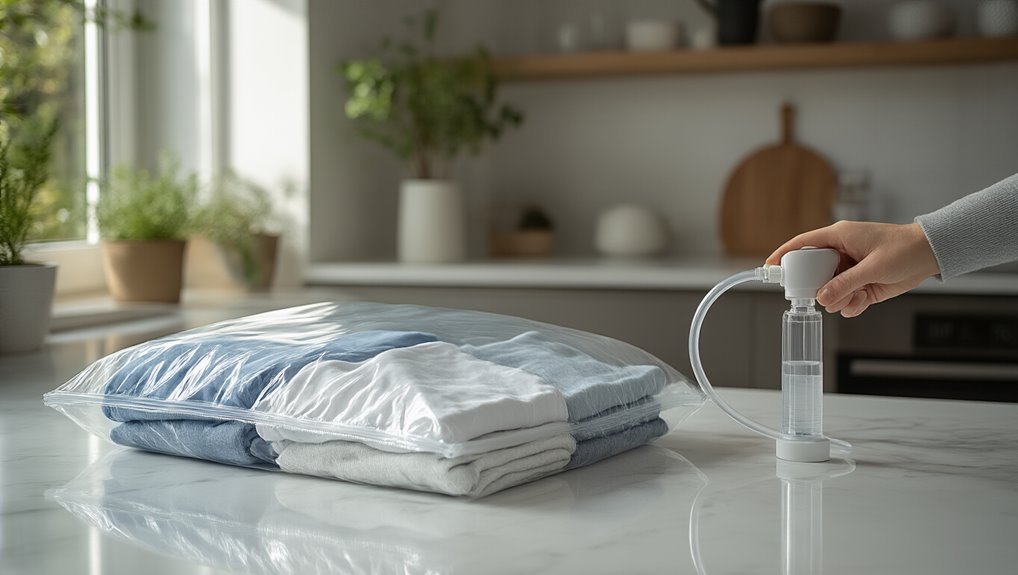
Manual vs. Electric Pumps: Which Is Best for Your Situation?
As you prepare to store away those bulky winter coats or pack for your next adventure, deciding between a manual or electric pump might seem like a small detail, but I’ve found it’s actually essential to the efficiency of your vacuum bags.
Manual strength comes with simplicity—no batteries to die mid-packing, no cords to untangle. I love how lightweight they’re for travel, and honestly, they’re way more affordable. But let’s be real—they do require some elbow grease.
When simplicity matters most, manual pumps deliver reliability without the tech headaches—just add a little muscle.
Electric convenience, on the other hand, is a game-changer if you’re compressing lots of items. I’ve compressed bulky comforters in under a minute with a good 55W model.
Yes, they’re pricier and need charging, but the time saved? Priceless for regular users like me!
Additionally, understanding how vacuum sealing reduces oxygen can help retain antioxidants in prepared foods oxygen reduction.
Step-by-Step Guide to Properly Sealing Clothes in Vacuum Bags
I’ve learned that properly prepping your clothes before vacuum sealing makes all the difference—neatly folding or rolling each item prevents those frustrating permanent creases.
Regular air removal is essential for maximizing space-saving results and preventing moisture buildup.
When it comes to the actual sealing technique, you’ll want to close the zipper most of the way, attach your pump (manual or electric works fine), and remove air slowly while smoothing out any wrinkles.
For the best compression results, I always double-check that the seal is completely airtight before storing, which helps maintain that space-saving magic until you’re ready to unpack.
Prep Before Packing
Before you toss your clothes into vacuum seal bags, proper preparation is key to getting the most out of these space-saving wonders. I’ve learned through trial and error that cloth folding technique makes a huge difference. Actually, rolling works even better for some items, like t-shirts and jeans, while folding is best for dress shirts.
Bag selection matters too—choose the right size for what you’re storing!
| Prep Step | Why It Matters | My Quick Tip |
|---|---|---|
| Fold/Roll Clothes | Prevents wrinkles | Roll softer items, fold structured ones |
| Clean Sealing Area | Ensures airtight seal | Wipe with dry cloth before closing |
| Leave Space at Top | Allows proper closure | About 2 inches is perfect |
| Check for Gaps | Prevents air leaks | Run finger along zipper after closing |
| Position Valve | For pump attachment | Keep it uncovered by clothing |
Efficient Sealing Techniques
Once your clothes are prepped and ready to go, the actual sealing process requires a bit of technique to get right.
I’ve found that proper sealing makes all the difference in how well your clothes compress.
First, zip the bag completely shut—no shortcuts here! Make sure there aren’t any gaps where the bag material meets the zipper. I think this is where most people mess up, honestly.
Then, attach the pump hose firmly to the valve (wiggle it a bit to ensure it’s secure).
Now for the satisfying part! Run the pump continuously until you see the bag material cling tightly around your clothes.
Sometimes I’ll need to unzip slightly and readjust if I notice any weird bulges—that’s normal and helps maximize compression.
Maximizing Compression Results
To achieve the most dramatic space-saving results, maximizing compression is where the real magic happens.
I’ve found that tightly folding or rolling clothes first makes all the difference in fabric safety and final volume.
You really need to guarantee that zipper seal is completely closed—I always run my finger along it to feel for gaps.
When connecting the pump, make sure it’s perfectly aligned with the valve.
Actually, wait—it’s not just aligned, but secured tightly against it.
In my experience, this prevents air from sneaking back in.
As you vacuum, watch your clothes shrink down to about 20% of their original size!
But don’t forget material compatibility—delicate fabrics like wool might need less compression to maintain their integrity.
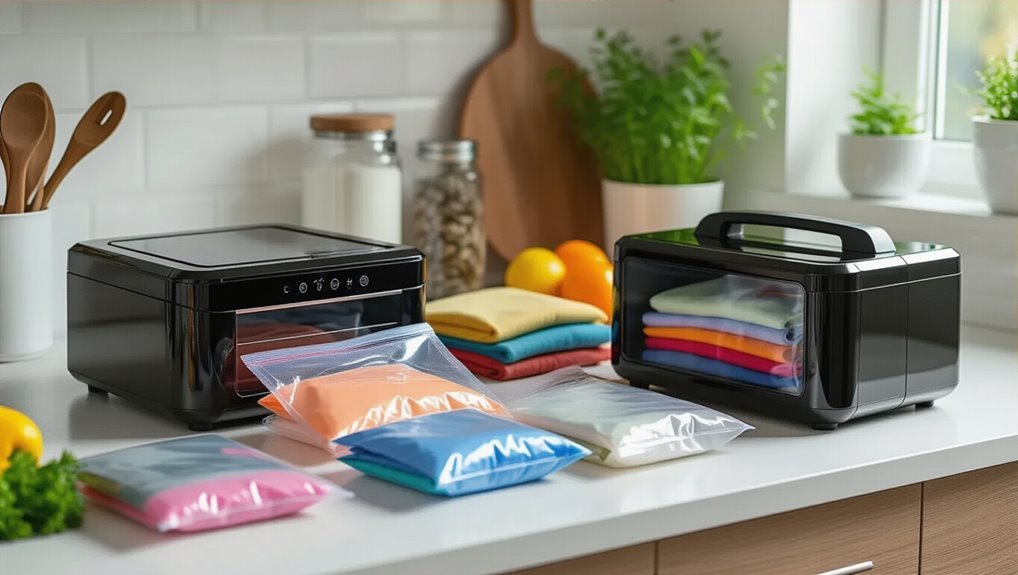
Travel-Friendly Vacuum Bag Systems: What to Look For
When packing for travel, I’ve found that the right vacuum bag system can make all the difference between struggling with an overstuffed suitcase and breezing through the airport with room to spare.
Just like quick freezing controls ice crystal size ice crystal size, efficient packing minimizes stress on fabrics.
I always look for lightweight, portable pumps – preferably USB rechargeable or manual options. You want bags that can compress your clothes by up to 80% (amazing what good vacuum bag aesthetics can do for space-saving!).
Durability is non-negotiable; waterproof materials protect everything while you’re on the move.
When it comes to travel vacuum storage, never compromise on durability. Waterproof materials are your belongings’ best defense against life on the road.
I think the most versatile systems include different bag sizes and decorative storage options for various trip lengths.
Quick operation is essential too – nobody wants to spend vacation time pumping air!
A powerful 55W electric pump gets the job done fast, though I sometimes prefer manual pumps for remote locations where electricity might be scarce.
Storage Tips: Maximizing Space in Closets, Luggage, and More

After years of struggling with overflowing closets and stuffed suitcases, I’ve discovered that vacuum seal bags are absolutely game-changers for creating space where there seemingly isn’t any.
Vacuum sealing can save up to 50% more space in storage areas, a key storage space advantage.
I’m constantly amazed by how much more organized my life has become with these simple tools.
For maximum efficiency, I recommend:
- Roll clothes tightly before sealing for better compression
- Use color coordination when packing similar items together for easy identification
- Implement seasonal rotation by storing off-season clothes in labeled bags
- Position bulkier items at the bottom of storage areas
I’ve found that storing vacuum-sealed bags upright in my closet makes the transparent panels work perfectly for quick identification.
When packing for travel, I’ll tuck the sealed bags into corners of my luggage—it’s incredible how much extra space this creates!
Common Vacuum Seal Problems and How to Fix Them
Despite my love for vacuum seal bags, I’ve encountered plenty of frustrating moments when they just wouldn’t seal properly. I’ve learned that vacuum bag materials matter tremendously—cheaper options often can’t withstand proper compression.
Most common problems have simple fixes, though. When debris gets caught in sealing mechanisms, I just wipe the seal clean before trying again. It’s like dental floss—you’ve gotta keep those surfaces clean!
For better results, consider equipment with Suction power and dual heat seals.
| Problem | Cause | Solution |
|---|---|---|
| Air leaks | Incomplete zipper closure | Double-check entire seal |
| Bag won’t compress | Weak pump | Use stronger pump/replace batteries |
| Re-inflation occurs | Temperature changes | Store in stable environment |
| Bag damage | Overstuffing/sharp items | Pack evenly, wrap sharp objects |
Fabric Care: Which Clothes Should Not Be Vacuum Sealed
Not all clothes are created equal when it comes to vacuum sealing. I’ve learned the hard way about fabric fragility when compressing certain items. Material restrictions definitely exist, and ignoring them can ruin your favorite pieces.
Vacuum sealing the wrong fabrics is a costly lesson in material science and personal regret.
Here’s what you should never vacuum seal:
- Delicate fabrics like silk, lace, and anything with beading – they’ll get crushed and lose their shape
- Wool and down items – compression damages their insulation properties and, well, they might never look the same again
- Pieces with embroidery or embellishments – the pressure can make decorations break or peel off
- Leather and suede garments – trust me, the cracking isn’t worth the space saved
Also, some fabrics benefit from air circulation rather than airtight sealing to preserve texture, so always consider air circulation when storing clothes.
Frequently Asked Questions
How to Use Vacuum Bags for Clothes With Pump?
I’d say vacuum storage is hardly rocket science! I connect my pump to the bag’s valve, suck out all air until clothes compression is complete, then seal it tight.
What Is the Best Vacuum Seal Bag for Clothes?
I’d recommend MagicBag or Livhil sets for their superior storage durability. Look for PE+PA blended materials for maximum material durability, and models featuring triple-valve seals and built-in electric pumps.
What Are the Disadvantages of Vacuum Sealing Clothes?
Like wrinkled paper, clothes can’t bounce back easily after vacuum sealing. I’ve found fabric damage occurs with delicate materials, while improper storage safety risks trapping moisture that causes mildew.
What Clothes Should Not Be Vacuum Sealed?
I don’t recommend vacuum sealing delicate fabrics like silk, wool, leather, or embellished items. These fabric types can become damaged or misshapen in compressed storage environments over time.