I’ve been perfecting my sous vide game this year, and honestly, it’s changed how I cook at home. You don’t need fancy chef skills—just the right temperatures and timing. My ribeye went from hit-or-miss to edge-to-edge perfection once I tried 129°F for two hours with a lightning-fast sear. I thought chicken breast would always be boring until… well, let me show you what happens at 145°F with some compound butter tucked inside.
Why Sous Vide Creates Restaurant-Quality Results at Home
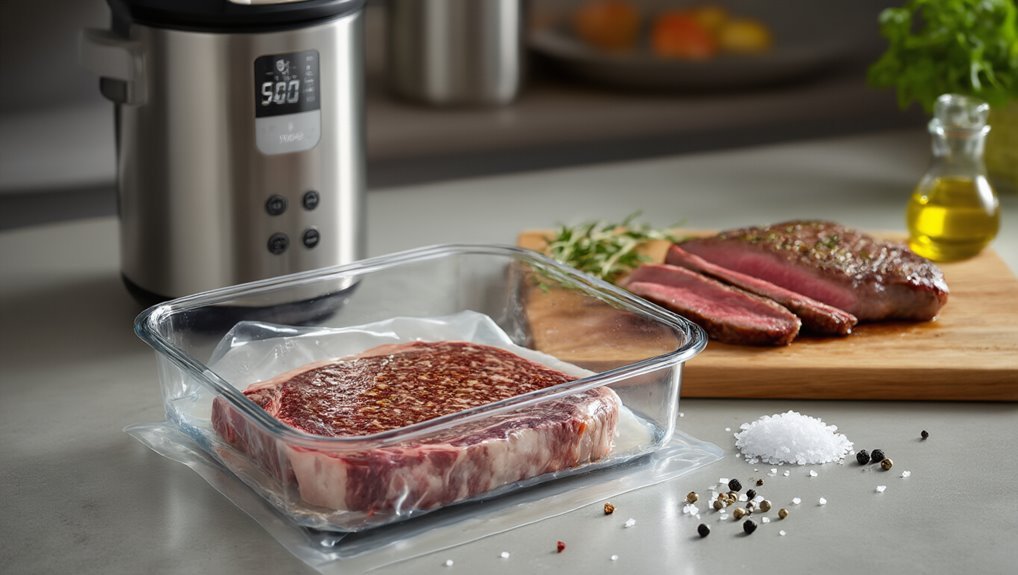
When I cook a thick steak conventionally, I’m constantly guessing about doneness, but sous vide eliminates that anxiety completely.
Say goodbye to steak anxiety—sous vide delivers perfect doneness every time without the guesswork.
The sealed moisture aspect is where the magic really happens.
By cooking proteins in a vacuum-sealed bag, I’ve found every bit of flavor stays locked in rather than evaporating or dripping away.
The results are honestly mind-blowing—edge-to-edge perfect doneness that’s identical whether I’m cooking one pork chop or six for guests.
While it does take longer than throwing something in a pan, I think the predictability and tenderness make it worth the wait.
Especially for expensive cuts you don’t want to risk overcooking.
Vacuum sealing also contributes to improved flavor retention and supports oxidation prevention by keeping air from contact with the food.
Perfect Sous Vide Steak: Temperatures and Techniques for Every Cut
Now that we’ve explored why sous vide creates those restaurant-worthy results, let’s get specific about the star of the show: steak.
This is where temperature control shines, delivering consistent doneness across the cut.
I’ve found that understanding marbling dynamics completely changes your approach.
Fattier cuts actually need more time in the bath—those beautiful fat veins act like natural insulators!
For thickness strategy, think about time commitment.
A 2-inch ribeye at medium-rare (129-134°F) needs roughly 2-3 hours, while a thinner filet might be done in just an hour.
What I love most?
The edge-to-edge consistency.
Your steak comes out perfectly pink throughout, not that gradient from gray to red you get with traditional methods.
Just remember to finish with a blazing-hot sear—30 seconds per side is usually all you need.
Trust me, it’s a game-changer.
Tender Sous Vide Chicken Breast With Foolproof Flavor Infusions
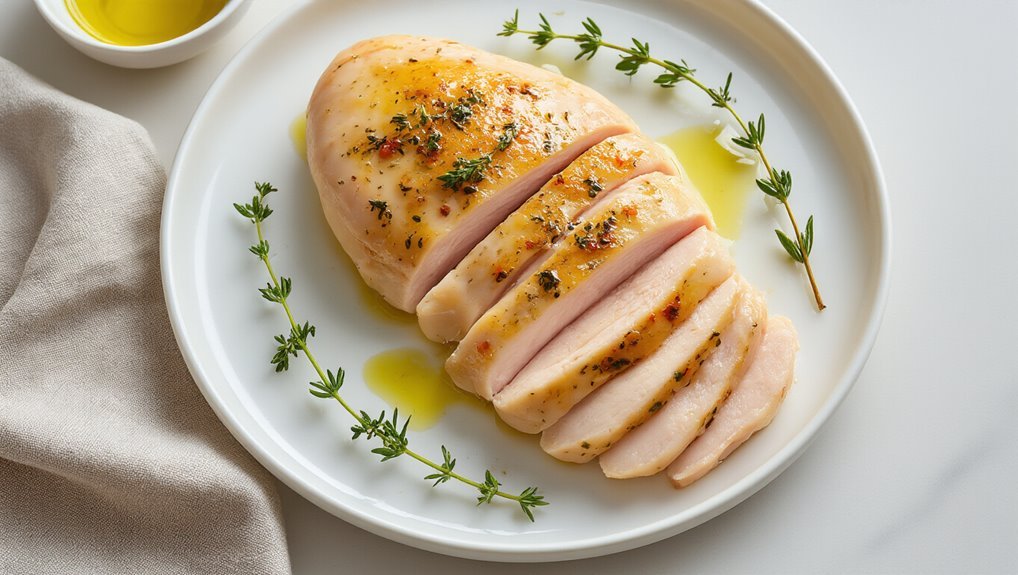
The humble chicken breast—often overcooked and underwhelming—transforms into something extraordinary when prepared sous vide.
Once a kitchen disappointment, sous vide elevates the humble chicken breast to spectacular new heights.
I’ve found that setting my circulator between 140-150°F gives that perfect balance where the meat stays incredibly juicy but is fully safe to eat.
What I love most is how simple herb infusion becomes—just toss fresh rosemary, thyme, or whatever strikes your fancy directly into the bag.
Lemon zest pairing with chicken is probably my favorite combination; it’s like they were made for each other!
Proper vacuum sealing improves flavor, shelf life, and even cooking, a cornerstone of sous vide technique vacuum sealing.
Cook for about 1-4 hours depending on thickness (I usually go with 2 hours for regular breasts), then finish with a quick sear. Trust me, you’ll never go back to conventional methods once you’ve experienced chicken this tender.
Silky Sous Vide Egg Bites: Customize Your Make-Ahead Breakfast
I’ve discovered that sous vide egg bites give you perfect texture every time—silky and custard-like instead of scrambled.
That silky texture hinges on precise temperature control, which ensures even cooking.
You can customize them with whatever mix-ins you love, from cheese and herbs to veggies and cooked meats.
What I appreciate most is how they’re a meal prep champion; I make a batch on Sunday and then I’m set with quick, delicious breakfasts all week.
Perfect Texture Every Time
Consistently, I’ve found that silky sous vide egg bites deliver the most luxurious texture you’ll ever experience in a breakfast dish. The secret lies in precise temperature control – maintaining 172-176°F guarantees that perfect custard-like consistency that practically melts in your mouth.
I always use a water bath setup when making mine. It might seem fussy, but trust me, it’s worth it for that impossibly smooth texture consistency that you just can’t achieve in a conventional oven. Well, that and not overfilling your molds – I learned that lesson the hard way!
The beauty of these egg bites is their reliability. Whether I’m making spinach-feta or bacon-cheddar variations, the texture remains soufflé-like and velvety every single time, which is why they’ve become my go-to breakfast prep.
Add Favorite Mix-ins
Customizing your silky sous vide egg bites transforms them from simply delicious to absolutely unforgettable.
I’ve found that savory tweaks like crispy bacon bits or caramelized mushrooms create texture contrasts that make each bite more interesting.
Before assembling your egg mixture, I always pre-cook additions like sausage or veggies—trust me, it’s worth the extra step.
The sous vide bath won’t brown anything, so you’ll want those flavors developed beforehand.
My go-to combination is sharp cheddar, spinach, and a touch of green onion, but you could honestly throw in whatever’s hanging out in your fridge.
The beauty of these egg bites is their versatility!
And since they’ll keep for nearly a week refrigerated, I’ll often make a batch on Sunday with different mix-ins for variety throughout my hectic workweek.
Meal Prep Champion
Why spend precious morning minutes scrambling eggs when you could have breakfast ready and waiting?
Sous vide egg bites are my absolute go-to for batch planning.
I’ll whip up a dozen on Sunday, and I’m set for the entire week!
These silky, custard-like bites maintain their perfect texture from edge to center thanks to precise temperature control.
For storage strategies that won’t let you down:
- Cool completely before refrigerating (prevents condensation)
- Store in airtight containers for up to 5 days in the fridge
- Freeze individually wrapped bites for up to 2 months
- Reheat for 30-60 seconds in the microwave
You know what I love most? Grabbing these protein-packed bites as I rush out the door—no morning cooking mess, just sophisticated breakfast deliciousness!
Butter-Poached Sous Vide Lobster and Shellfish Without the Guesswork
When I first tried butter-poached lobster sous vide, I couldn’t believe how foolproof it was compared to traditional methods where I’d constantly worry about overcooking. With sous vide, precise temperature control unlocks consistent texture from first bite to the last. The secret is maintaining that perfect 140°F bath, which keeps the meat tender and opaque without turning it rubbery.
I’ve found that seafood timing is absolutely essential—30 to 45 minutes is the sweet spot.
What really elevates the dish, though, are the butter emulsions.
Sealing your lobster chunks with clarified butter, garlic and lemon creates this incredible flavor that permeates evenly.
After cooking, I like to finish with a quick hot-butter sear for that gorgeous glossy look.
And don’t waste that reserved butter!
It makes, um, probably the most luminous sauce you’ll ever drizzle over seafood.
Trust me on this one.
Succulent Sous Vide Duck Confit in a Fraction of the Traditional Time
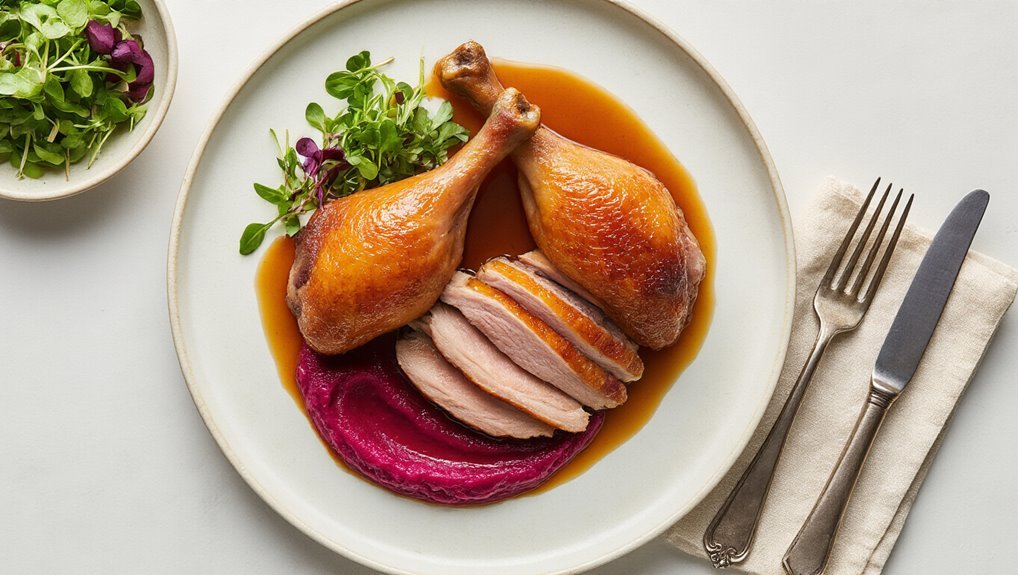
I’ve always found traditional duck confit intimidating, but sous vide has completely changed that for me.
This relies on precise heat control and vacuum sealing to lock in juices.
You’ll get all the rich, tender goodness of classic confit with considerably less hands-on work – just season, bag, and let the precision cooker do its magic. What I love most is how consistent the results are; every time I make this, the meat falls perfectly off the bone while maintaining that luxurious texture throughout.
Traditional Technique Simplified
Traditional French duck confit often feels intimidating for home cooks, but sous vide has completely transformed this classic technique.
When I first discovered how sous vide simplifies this cure history-rich dish, I was honestly amazed.
It’s like the braise lore of centuries condensed into a practical modern method.
Here’s why sous vide confit is a game-changer:
- No fussy temperature monitoring – your circulator maintains perfect heat
- Dramatically reduced hands-on time – just bag, set, and walk away
- Consistent results every time – the precision eliminates guesswork
- Authentic flavor without the labor – you’ll still get that rich, traditional taste
I think what’s most impressive is how sous vide captures the soul of traditional confit while making it accessible for a Tuesday night dinner.
Rich, Tender Results Guaranteed
The magic of sous vide duck confit doesn’t just lie in its simplicity—it’s the incredible results that’ll truly win you over.
I’ve found that this approach transforms a traditionally complex poultry dish into something you can easily master at home.
What’s fascinating is the texture science behind it.
The controlled temperature environment guarantees every fiber of meat reaches that perfect tenderness without drying out.
I think the juiciness techniques at work here are pretty remarkable—the duck bathes in its own fat at a precise temperature, creating that classic confit flavor while maintaining consistent moisture throughout.
You know, I used to be intimidated by duck confit, but this sous vide method guarantees rich, tender results every time.
The meat simply falls off the bone, and well, isn’t that exactly what we’re after?
Vibrant Sous Vide Vegetables That Retain Color, Texture, and Nutrients
While conventional cooking methods often lead to dull, lifeless vegetables, sous vide creates stunning, vibrant side dishes that’ll make you rethink what vegetables can be.
The magic happens through controlled pigment kinetics and carotenoid stability at those perfect lower temperatures—usually around 84°C for 30-60 minutes.
The science of color preservation at precise temperatures transforms ordinary vegetables into visual and nutritional masterpieces.
Precise temperature control ensures even cooking across all pieces.
I’ve found the results truly spectacular.
Here’s what makes sous vide vegetables superior:
- Edge-to-edge doneness – no more gray, mushy centers
- Vibrant color preservation – the pigments stay intact rather than leaching out
- Texture control – firm yet tender, never waterlogged
- Nutrient retention – vitamins stay locked in the vegetable
My favorites? Definitely glazed carrots and corn on the cob.
They’re amazingly sweet and juicy with that quick finish of a glaze or sear.
Melt-in-Your-Mouth Sous Vide Pork Belly and Ribs
Have you ever experienced the transformation of tough, fibrous pork cuts into something so tender you’d swear it’s melting on your tongue?
That’s the magic of sous vide.
Vacuum sealing locks in flavor locks in flavor and ensures the pork stays juicy throughout the long cook.
When I cook pork belly or ribs this way, I’m always amazed by the edge-to-edge consistency.
For ribs, I recommend a 24-hour bath at 145°F, followed by my favorite part: the finishing touches.
Glazing techniques are essential here—I like to brush on a sticky, sweet glaze before a quick blast under the broiler.
Sometimes, I’ll use smoke finishing to add that authentic BBQ flavor without the hours of tending a pit.
Pork belly benefits from a similar approach, but I’ve found that a longer bath (36 hours) creates that incredible melt-in-your-mouth texture you just can’t get any other way.
Delicate Sous Vide Custards and Desserts Without Water Bath Anxiety
I’ve found that sous vide custards, especially crème brûlée, have completely changed my dessert game—no more water bath anxiety or that dreaded curdled texture.
You’ll get that silky, perfect consistency at around 85-90°C for about 45 minutes, and trust me, the edge-to-edge creaminess is worth the wait.
Actually, I think it’s the most foolproof way to impress guests with restaurant-quality egg-based desserts without constantly peeking into the oven!
This method thrives on temperature control, delivering uniform gels and avoiding cracks.
Foolproof Crème Brûlée
Why struggle with traditional water baths when sous vide can transform your crème brûlée experience?
I’ve found that precise temperature control (85-90°C) delivers the silkiest custard texture imaginable—something that’s nearly impossible on a stovetop.
The beauty lies in its simplicity and reliability.
Here’s my foolproof approach:
- Bag your custard mixture with minimal air, adding a splash of extra cream if you prefer richer results
- Cook at precise temperature for about 45 minutes—no more water bath anxiety!
- Chill thoroughly before applying an even sugar layer
- Perfect your caramelization technique with a torch for that signature crack
Trust me, once you’ve tried this method, you’ll never go back.
The consistent results, especially when making multiple servings, are absolutely game-changing.
Perfect Egg-Based Sweets
The world of egg-based desserts opens up dramatically when you introduce sous vide techniques to your kitchen arsenal.
I’ve found that maintaining yolk stability at precisely 85-90°C transforms ordinary custards into silky-textured masterpieces.
What I love most about sous vide custards is the reliability factor.
You know that anxiety when checking water baths every five minutes? Gone.
Instead, your crème brûlée or bounet cooks evenly for 45 minutes with minimal risk of curdling.
I recommend using small sealed containers—jars work perfectly—then chilling thoroughly after cooking.
This develops that creamy, scoopable consistency we’re all after.
For crème brûlée, well, nothing beats finishing with a torch for that gorgeous contrast between the caramelized top and silky custard beneath.
Essential Sous Vide Equipment: What You Need and What You Don’t
When diving into sous vide cooking, you’ll quickly discover that successful water bath cooking doesn’t require a kitchen overhaul—just a few essential tools.
I’ve found that starting with budget options actually makes sense while you’re learning.
If you plan to store sous vide results, a vacuum sealer like Foodsaver can extend shelf life up to five times longer extended shelf life.
In my experience, a good immersion circulator is worth investing in, but you can initially use zip-top bags instead of an expensive vacuum sealer.
For sous vide success, you’ll need:
- An immersion circulator (the heart of your setup)
- Heat-safe container (doesn’t have to be fancy—I use a large pot)
- Vacuum sealer or quality zip-top bags (for the water displacement method)
- Digital thermometer (critical for verifying doneness)
Don’t forget maintenance tips: regular descaling of your circulator and thorough drying of equipment prevents issues down the road.
Frequently Asked Questions
Can I Reuse the Vacuum Bags for Multiple Sous Vide Cooks?
I’m absolutely astounded by bag durability these days! You can reuse vacuum bags for multiple cooks if they’re intact, but I limit reuse frequency to 2-3 times depending on what I’ve cooked.
How Do I Prevent Floating Bags During Long Cooking Sessions?
I prevent floating bags by thoroughly removing all air before sealing. If needed, I’ll place small weights on the bags or clip them to the side of the container during those long cooks.
Is It Safe to Sous Vide Frozen Meat Without Thawing First?
You might wonder if direct cooking from frozen is risky. I’m pleased to tell you it’s absolutely safe! I often sous vide frozen meat without thawing, just add 50% more time for proper frozen safety.
Can Sous Vide Equipment Be Used for Anything Besides Cooking?
I’ve seen sous vide equipment used for lab experiments where precise temperature control is critical, and in industrial testing applications. It’s basically a high-precision water bath with various scientific and technical applications.
How Long Can Sous Vide Foods Safely Stay in the Water Bath?
Safely speaking, sous vide stays depend on temperature stability. I’d keep food at 130°F+ for no longer than 4 hours, following storage guidelines carefully. Lower temps require more caution with timing.