Like discovering fire must have felt to our ancestors, my first sous vide experience completely transformed how I approach cooking. I’ve learned that mastering this technique isn’t about fancy equipment—it’s about understanding the fundamentals of temperature, time, and texture. The beauty lies in its precision; you’ll never overcook a steak again once you grasp these basics. Want to know what separates good sous vide cooking from truly exceptional results that’ll make your dinner guests wonder if you hired a professional chef?
What Is Sous Vide and Why Home Cooks Love It?

What exactly is sous vide cooking, and why has it become such a game-changer in home kitchens?
Simply put, it’s a French technique meaning “under vacuum” where food is sealed in bags and cooked in precisely controlled water baths. Despite vacuum myths suggesting specialized equipment is required, the real magic happens through temperature control, not the vacuum itself.
Vacuum sealing enhances heat transfer in sous vide cooking, helping eliminate air pockets and deliver even temperatures.
I’ve found the flavor science behind sous vide absolutely fascinating.
When proteins cook at exact temperatures, they retain more moisture and develop better texture.
In my experience, it’s like having a professional chef’s consistency at home – I can achieve perfect edge-to-edge doneness every time.
Plus, the “set it and forget it” nature means I’m free to handle other tasks while dinner basically cooks itself.
What’s not to love?
Essential Sous Vide Equipment for Beginners
I’ve found that getting started with sous vide cooking doesn’t require a ton of fancy equipment.
You’ll absolutely need an immersion circulator like the Anova or Joule Turbo, plus a decent-sized container (I love my 8-quart Cambro for everyday use).
For sealing food, you can either invest in a vacuum sealer or simply use zipper-lock freezer bags when you’re just beginning—both work great for most recipes I’ve tried.
Essential Equipment
The essential equipment for sous vide cooking doesn’t need to break the bank when you’re just getting started. I personally recommend beginning with an immersion circulator—Anova and Joule are my go-to brands for their reliability and brand compatibility with various containers.
| Equipment | Budget Option | Premium Choice |
|---|---|---|
| Circulator | Anova Precision | Joule Turbo |
| Container | Cambro 8-quart | 4.75-gallon tub |
| Sealing | Zip-top bags | Nesco VS-12 Sealer |
For containers, I’ve found that a simple Cambro works better than fancy stand-alone units like the SousVide Supreme. They’re more versatile, honestly. When considering warranty considerations, I’d recommend checking if your circulator covers water damage—that’s something I learned the hard way! You’ll thank me later when you accidentally submerge the control panel.
Budget-Friendly Options
For beginners looking to explore into sous vide cooking, expensive equipment isn’t necessary to achieve professional results.
I personally started with an Anova Precision Cooker—one of those affordable circulators in the $200-300 range that won’t break the bank but still maintains precise temperatures.
Instead of fancy containers, I use a simple Cambro 8-quart storage container.
It’s perfect for most cooking needs and, well, it’s a fraction of what specialized equipment costs.
One of my favorite budget strategies? Skip the vacuum sealer initially.
You can use regular freezer bags with the water displacement method for most recipes.
If you do want some frugal upgrades later, the Nesco VS-12 is a reasonable option when you’re ready to invest a bit more.
Setup and Placement
Setting up your sous vide station correctly makes all the difference between culinary frustration and seamless cooking.
I’ve found that proper clamp placement is essential—secure your immersion circulator to a container’s side where it can fully circulate water without creating dead spots.
For my setup, I prefer using a Cambro container with a lid that has a cutout for the circulator, which dramatically reduces evaporation during long cooks.
If counter space is limited in your kitchen, consider cabinet mounting options.
You know, I actually tried hanging my setup on a pull-out shelf, and it’s been a game-changer.
Just make sure your container is within reach of an outlet—I learned that lesson the hard way when I first started!
The right placement means you’ll enjoy the process more.
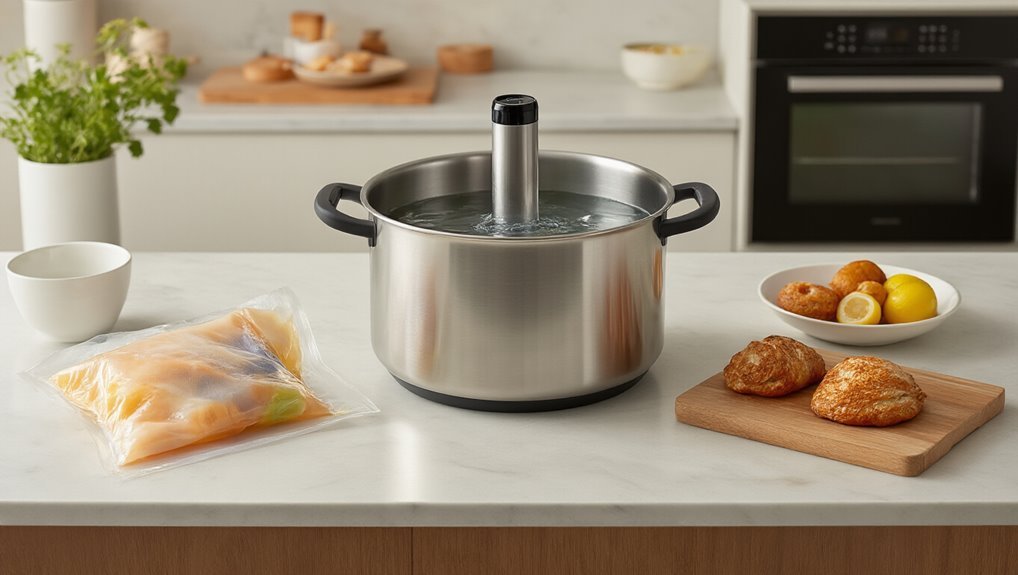
Setting Up Your First Sous Vide Water Bath
When I set up my first sous vide bath, I found that choosing the right container and circulator makes all the difference in temperature stability.
Mastering temperature control is essential for consistent doneness and nutrient preservation.
You’ll want to match your container size to what you’re cooking—an 8-quart Cambro works great for most home cooks, while larger families might need that 4.75-gallon tub I eventually upgraded to.
Once everything’s in place, don’t forget a lid (even improvised) to manage water temperature and reduce evaporation, which I learned the hard way after my first 12-hour cook nearly ran dry.
Choosing Proper Equipment
What equipment do you really need to get started with sous vide cooking at home?
I’ve found that you don’t need to break the bank initially.
Start with an immersion circulator like the Anova Precision Cooker or Joule Turbo—I always check warranty terms since these are electronic devices.
Brand reliability matters; both these brands have solid reputations.
For your container, a deep pot you already own works fine!
I personally began with an 8-quart stockpot before upgrading to a Cambro tub.
You’ll want something at least 6 inches deep with a lid to maintain stable temperatures.
For sealing food, start with zipper freezer bags using the water displacement method.
It’s actually pretty simple—no fancy vacuum sealer required yet.
As you gain experience, you might want to invest in better equipment, but these basics will get you cooking beautifully.
Container Size Matters
The water bath container size might seem like a minor detail, but I’ve found it’s actually essential to sous vide success.
I recommend starting with an 8-quart plastic Cambro container rather than your standard kitchen pot.
They provide better insulation and, more importantly, adequate depth sufficiency for proper water circulation around your food.
For lid compatibility, look for covers with pre-cut circulator openings.
This prevents heat loss and helps maintain consistent temperatures, which is, you know, the whole point of sous vide cooking.
If you’re cooking for a crowd, don’t hesitate to size up to a 4.75-gallon tub.
And remember, you need at least 6 inches of depth for proper immersion.
I prefer rectangular containers myself—they fit better around the circulator and take up less counter space in my tiny kitchen.
Water Temperature Management
Managing water temperature for sous vide cooking isn’t just important—it’s the entire foundation of this cooking method.
When I set up my circulator, I make sure it stabilizes quickly to my target temperature—like 130°F for a medium-rare steak.
Temperature drift is your enemy here; even a variation of 1°F can affect results during long cooks.
I’ve found that using a proper container with a lid dramatically improves heat diffusion throughout the bath.
Trust me, you don’t want to keep adjusting the temperature once you’ve started.
The magic of sous vide is in maintaining that steady environment.
Remember that pasteurization is all about time and temperature working together.
Sous Vide Food Safety: Temperature Zones and Storage Guidelines
When cooking sous vide, understanding food safety zones isn’t just important—it’s absolutely crucial to your culinary success and your family’s health.
I’ve learned that the “danger zone” between 40°F and 130°F is where bacteria love to multiply, so you’ll want to minimize time there.
Additionally, to prevent plastic safety concerns, use high-quality, food-grade bags food-grade bags designed for sous vide.
Unlike traditional cooking, sous vide relies on pasteurization thresholds—specific temperature/time combinations that make food safe.
Sous vide isn’t about cooking hot—it’s about cooking smart through precise time-temperature relationships that eliminate harmful bacteria.
For example, chicken at 136°F needs about 63 minutes to pasteurize.
Pretty cool, right?
After cooking, don’t forget rapid cooling if you’re not eating immediately.
I always plunge my bags in ice water before refrigerating.
This prevents, well, prevents bacteria from throwing a party in your leftovers.
In my experience, this quick cool-down step preserves both safety and those amazing textures we love sous vide for!
Sous Vide Cooking Times and Temperatures for Perfect Results

Now that we’ve covered safety, let’s talk about what many home cooks find most challenging about sous vide—figuring out exactly how long and at what temperature to cook different foods.
I’ve found that a reliable doneness chart is absolutely essential. For beef, I aim for 130°F when I want that perfect medium-rare, edge-to-edge pink.
Pork thrives between 135-145°F—I usually go with 138°F for about 3 hours for most cuts.
Chicken’s a bit tricky; I maintain it at 136°F for at least 63 minutes to guarantee it’s safe yet incredibly juicy. In practice, vacuum sealing with aromatics helps flavors penetrate the meat and can extend its shelf life.
Fish, well, that’s probably the most delicate. I keep mine between 122-132°F, but temperature calibration is vital here since even small variations can mean the difference between silky and mushy textures.
How to Sear and Finish Sous Vide Proteins Like a Pro
I’ve found that perfect searing is all about creating that beautiful crust without overcooking the protein you’ve so carefully prepared sous vide.
Understanding vacuum sealing is key, since it helps with even heat distribution and flavor retention.
In my experience, timing matters tremendously after the water bath—I usually pat my steaks bone-dry, then hit them with intense heat in a cast-iron skillet that’s practically smoking.
You’ll want to work quickly, no more than a minute or two per side, because the goal isn’t to cook further but to create that magical Maillard reaction that gives your protein the perfect finishing touch.
Perfect Searing Techniques
The perfect sear is perhaps the most essential final step in your sous vide journey.
After all that precise temperature control, I’d argue the crust chemistry is what transforms your food from perfectly cooked to restaurant-worthy.
Searing history teaches us that Maillard reactions—those complex flavor compounds that develop under high heat—are what create that mouthwatering exterior we crave.
I always follow these key techniques for a stunning finish:
- Pat the meat completely dry—moisture is the enemy of a good crust
- Use a ripping-hot cast iron (500°F+) with minimal oil
- Sear quickly (1-2 minutes per side) and resist the urge to fiddle with it
A torch finish can add that extra dimension of flavor when you need it. Trust me, your patience will be rewarded!
Post-Bath Timing Matters
Why do so many home cooks stumble at the finish line after a perfect sous vide bath?
I’ve found timing is everything.
After pulling your protein from its water bath, you’re in a critical cooling phase that determines your final result.
Pat that steak completely dry—I mean bone dry—before hitting a screaming-hot skillet.
This is non-negotiable for developing that beautiful crust.
I typically sear just 60-90 seconds per side, depending on thickness.
Need a resting period before serving?
You can actually use a quick ice bath to halt cooking if you’re not ready to sear immediately.
This prevents that dreaded temperature creep that can undo all your precise sous vide work.
5 Common Sous Vide Mistakes and Their Quick Fixes
Despite all the incredible benefits of sous vide cooking, even experienced home chefs can stumble into a few common pitfalls that might leave them scratching their heads when results don’t match expectations.
I’ve seen bag integrity issues cause the most frustration – nothing worse than finding water leakage has ruined your beautiful steak!
The good news? Most sous vide mishaps have simple fixes:
- Always double-check your bags before submersion – use proper heat-rated bags and guarantee they’re completely sealed
- Don’t rely solely on target temperature – make sure your water bath maintains consistent heat throughout cooking
- Pat your food completely dry before searing – moisture is the enemy of that perfect, crusty finish
Trust me, once you eliminate these common mistakes, you’ll wonder why you ever cooked any other way! As a reminder, precise temperature control is the cornerstone of reliable sous vide results across vegetables.
Unexpected Foods That Shine With Sous Vide Cooking
Most people think sous vide’s just for steaks and chicken breasts, but I’ve discovered it’s actually a game-changer for foods you’d never expect.
Those glazed carrots you’ve been struggling to perfect? At 183°F, they become incredibly tender in their own juices, especially when you reduce that liquid in a skillet afterward.
And eggs? Well, they’re probably my favorite sous vide surprise. You get these tender eggs with fudgy, just-set textures that are impossible to achieve consistently on a stovetop.
This is largely due to temperature control, a core advantage of sous vide that keeps textures consistent from edge to center.
I’ve even made yogurt and ricotta this way!
And don’t get me started on desserts—crème brûlée turns out amazingly creamy without the usual water bath hassle.
Trust me, once you start experimenting beyond proteins, you’ll wonder why you limited yourself before.
Sous Vide Meal Prep: Cook Once, Eat All Week
I cook proteins to perfect doneness once, then store them in my freezer inventory for later.
After cooking, I quickly cool the bags in ice water before refrigerating or freezing in batch portions.
What I love about this approach:
- Vacuum-sealed portions maintain moisture and flavor for weeks in the fridge or months in the freezer
- Pre-cooked steaks at precise temperatures (like 130°F for medium-rare) need just a quick sear to finish
- Individual portions in properly sized containers heat more evenly when reheated
The flexibility is amazing—I can cook a week’s worth of perfectly done proteins on Sunday, then actually enjoy my weeknights instead of stressing about dinner.
This approach also underscores the importance of air-tight packaging in preserving moisture and flavors during sous vide cooking.
Taking Your Sous Vide Skills Beyond Basics: Next-Level Techniques
Once you’ve mastered the fundamentals of sous vide cooking, how do you take your skills to the next level?
I’ve recommended diving into texture experimentation with long, low-temp cooks for tough cuts.
For truly consistent results, invest in a vacuum sealer to ensure an airtight seal for long cooks.
I’ve found that a 24-hour brisket at 155°F creates a melt-in-your-mouth experience that’s impossible to achieve with traditional methods.
Transform your brisket game with a 24-hour sous vide at 155°F for texture that traditional methods simply can’t match.
Flavor layering becomes your secret weapon.
Try infusing herbs during the sous vide process, then finishing with completely different aromatics during searing.
And don’t limit yourself to meats!
Some of my best sous vide discoveries happened when I ventured into desserts like crème brûlée or even homemade yogurt.
The water displacement method with zipper bags is actually perfect when you’re in a hurry—no fancy vacuum sealer required.
Frequently Asked Questions
What Are the Basics of Sous Vide Cooking?
I’d say sous vide basics include precise temperature control using an immersion circulator, vacuum sealing food in bags, and cooking in a water bath for perfect doneness every time.
What Is the Downside of Sous Vide?
I’ve found sous vide’s downsides include safety concerns with plastic bags, equipment cost for circulators and containers, lengthy cooking times, the need for additional searing steps, and limited spontaneity for quick weeknight meals.
What Are Some Common Sous Vide Mistakes?
Like ships sinking from invisible leaks, I’ve seen countless sous vide attempts fail from poor vacuum seals and timing errors. Don’t ignore pasteurization times, skip proper searing, or use unsafe bags either.
Do Ziploc Bags Work for Sous Vide?
Yes, I use ziploc freezer bags for sous vide regularly. Just guarantee they’re BPA-free with good seal integrity and bag durability for your cooking temperature. Water displacement method works perfectly for air removal.