I think chicken breast is the best thing to sous vide when you’re just starting out. It’s incredibly forgiving and shows you exactly what makes this cooking method special – that juicy, perfectly even texture that’s nearly impossible to get otherwise. I’ve found that 145°F for two hours hits that sweet spot between safety and tenderness. Plus, you’ll never go back to dry, overcooked chicken once you’ve experienced what proper temperature control can do.
Why Sous Vide Is Perfect for Beginners (And Which Foods to Start With)

Why is sous vide such a game-changer for kitchen newbies?
It’s basically forgiveness in cooking form.
Sous vide doesn’t just cook food—it erases the anxiety of timing and transforms kitchen mistakes into masterpieces.
When I first started, I was amazed how the edge-to-edge doneness gave me a safety net for timing—no more panicking about overcooking!
Mastering temperature control is where sous vide shines, and understanding the core doneness makes recipes feel almost foolproof.
For safety basics, you’ll want to remember temperatures like 140-155°F for chicken and 140°F for pork.
Actually, I meant to say 140°F for juicy pork.
The equipment essentials are pretty straightforward too.
I think eggs, salmon, and asparagus are perfect first attempts—they’re like the training wheels of sous vide cooking.
They respond so predictably to temperature that it’s hard to mess up.
After mastering your core doneness, you can worry about searing for that crust later.
Sous Vide Chicken Breast: The Foolproof First Project
Here’s my simple temperature guide:
| Temperature | Texture | Cook Time | Pasteurization Time |
|---|---|---|---|
| 141°F (60.5°C) | Veal-like, super tender | 2-4 hours | ~1.5 hours |
| 145°F (63°C) | Juicy, medium firm | 1.5-3 hours | ~40 minutes |
| 150°F (66°C) | Traditional, still moist | 1-2 hours | ~12 minutes |
| 155°F (68°C) | Firmer, conventional | 1 hour | ~5 minutes |
What’s incredible is that you can safely cook at lower temps than the typical 165°F without drying out the meat—the extended pasteurization time handles food safety. Trust me, you’ll never look at chicken breast the same way! Vacuum sealing also reinforces Flavor preservation by locking in juices and aromas during low-temperature cooking.
Sous Vide Pork Chops: Transform Tough Cuts Into Tender Meals
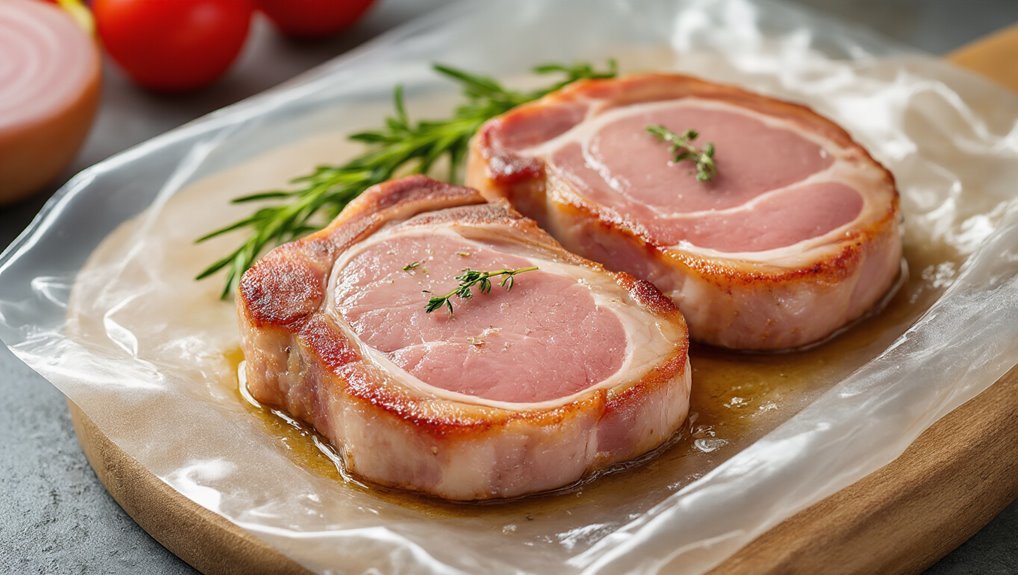
I’ve become obsessed with sous vide pork chops because they’re honestly the perfect foolproof mealtime hero—achieving that ideal doneness every single time.
For delicate proteins and liquids, use pulse vacuuming to protect texture and prevent leaks pulse vacuuming.
You’ll never struggle with dry, tough pork again as the precision of water bath cooking transforms even budget cuts into juicy, flavor-packed masterpieces.
Trust me, once you’ve experienced the buttery texture of a 140°F pork chop with a quick sear finish, you’ll wonder how you ever cooked them any other way.
Perfect Doneness Every Time
When you’re tired of dry, overcooked pork chops that turn into something resembling shoe leather, sous vide cooking offers the perfect solution.
I’m constantly amazed by the doneness precision you achieve with this method—cooking at exactly 140°F gives you juicy chops with that slightly pink center that’s perfectly safe to eat.
In my experience, the beauty of sous vide is you don’t need to hover with a thermometer constantly checking temperature.
Well, you actually might need to calibrate your thermometer once, but after that, you’re set!
The water bath maintains a consistent temp for the entire cooking time, whether that’s one hour or four.
I think it’s especially brilliant for those thick-cut chops that would typically dry out at the edges before the center’s done.
Juicy, Flavor-Packed Results
Beyond getting the temperature right, what really excites me about sous vide cooking is how it transforms even the most ordinary pork cuts into something extraordinary.
I’ve found that pork chops—often dry when traditionally cooked—become incredibly juicy at 140°F, with a hint of pink that’s perfectly safe.
The marinade science here is fascinating!
When sous vide cooking, the fat emulsions created during the long, gentle heating process actually help distribute flavor throughout the meat, not just on the surface.
I think that’s why bourbon-glazed tenderloin or a rosemary caramel sauce works so wonderfully with this method.
After the bath, I always finish with a quick sear.
You know, that crust doesn’t just look pretty—it’s where a whole new dimension of flavor happens.
No brining needed!
Foolproof Mealtime Hero
Ever wondered why so many home cooks fear pork chops? I certainly did, until I discovered sous vide. This technique has transformed these family favorites into my go-to for meal prep, eliminating the dreaded dry, tough results that made me avoid them for years.
| Temperature | Cooking Time | Result |
|---|---|---|
| 140°F (60°C) | 1 hour | Tender, juicy, slight pink |
| 141°F (60.5°C) | 1 hour | Firmer texture, less pink |
| 145°F (63°C) | 1 hour | Traditional doneness, still moist |
The best part? You don’t need brining! Just season your chops, drop them in the bath, and after an hour, pat dry and sear for about a minute per side. Finish with a quick pan sauce, and you’ll never fear serving pork chops again.
Sous Vide Eggs: 30-Minute Magic for Breakfast Perfection
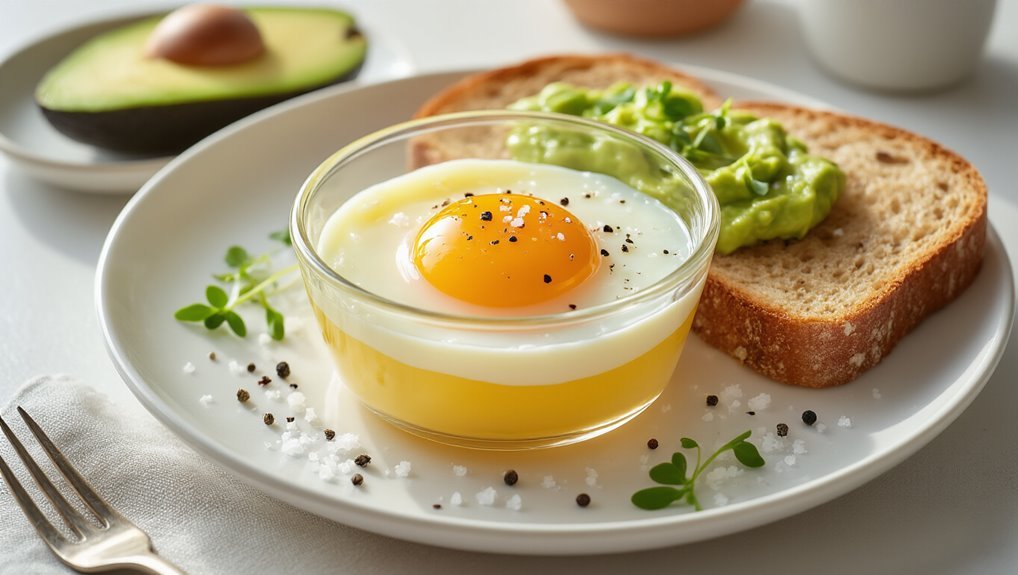
I’ve found that temperature is the real magic behind sous vide eggs—even a 1°C difference can transform your breakfast from runny to perfectly set. This temperature control framework is what unlocks repeatable results.
With a precise water bath set to your preferred temp, you’ll get identical results every time for all your eggs, unlike the hit-or-miss nature of traditional poaching.
When you give them about 30 minutes in the bath, you’re creating the ideal texture that’s consistent from edge to edge, something I couldn’t achieve before trying this method.
Temperature Matters Most
The temperature dial on your sous vide machine might seem like just another setting, but when it comes to eggs, it’s the magic wand that transforms your breakfast experience.
I’ve learned that even a single degree can make the difference between runny and custardy—no exaggeration!
What I love most about sous vide eggs is how the ambient calibration eliminates guesswork.
You know when you’ve tried traditional poaching and suffered through that thermal lag where you can’t quite tell if they’re done? Yeah, that’s history now.
The shell is actually your friend here, creating a perfect natural barrier.
I typically start with 63.5°C for that jammy yolk with just-set whites—though sometimes I’ll go to 64° if I want, um, slightly firmer results. It’s like having breakfast on autopilot!
Timing Creates Texture
While temperature sets the stage for your sous vide egg masterpiece, timing conducts the symphony of texture.
I’ve found that 30 minutes gives you those barely-set whites with a flowing yolk, while an hour delivers firmer results with that gorgeous edge progression we’re all chasing.
The magic happens at around 63°C (145°F), where you’ll notice dramatic changes in yolk viscosity with just small time adjustments.
Want that perfect poached texture? Aim for 45 minutes and you’ll get whites that hold together with a creamy-but-not-runny center.
What I love most about this method is how predictable it is.
Unlike traditional poaching where, let’s be honest, results vary wildly, sous vide gives you identical eggs every single time.
That’s priceless when you’re trying to impress at breakfast!
Sous Vide Salmon: The Fish That’s Impossible to Overcook
Have you ever experienced that moment of panic when cooking fish, watching it transform from perfectly done to dry and tough in mere seconds?
That’s why salmon is my favorite sous vide starter project.
At 115°F for 45 minutes, you’ll achieve a texture consistency that’s impossible to mess up—tender and moist every time, regardless of the fillet’s thickness. I’ve found that pre-seasoning the salmon before sealing creates amazing flavor infusion without affecting doneness.
This approach is aligned with the fundamentals of vacuum sealing, which enhances flavors, shelf life, and meat quality.
What I love most is how forgiving this method is. The precision of the water bath means you’ll get that perfect edge-to-edge doneness that’s, well, actually impossible to overcook. After the bath, I like to finish mine with wilted spinach and Dijon cream sauce for a savory contrast that’ll make you wonder why you ever cooked salmon any other way.
Simple Sous Vide Vegetables for Beginners: Carrots, Asparagus, and Corn
Vegetables, once the afterthought of sous vide cooking, have completely changed my approach to simple weeknight sides.
Carrots are my go-to starter—183°F transforms them into tender, flavor-packed bites that, when reduced in a skillet, create an incredible glaze with zero flavor loss.
Asparagus is probably the easiest entry point.
It’s quick, pairs with practically everything from eggs to steak, and—unlike some vegetables—maintains its seasonal varieties’ distinct character.
Corn is another winner I can’t get enough of.
After sous vide, I like to sauté it with onion and red pepper for a bright side that basically steals the show.
What’s great about these veggies is their forgiving storage methods—they’ll hold in the fridge for days after cooking, making meal prep almost too simple.
With precise temperature control, you can consistently hit tender textures while preserving nutrients.
Sous Vide Time and Temperature Guide for Beginner-Friendly Foods
Although mastering sous vide seems intimidating at first, the precision of time and temperature makes it surprisingly forgiving for beginners.
I’ve found chicken breasts to be perfect for newcomers—just set to 145°F for 2 hours and you’ll avoid those safety misconceptions about poultry needing to be bone-dry to be safe.
Steaks are probably my favorite beginner project: 129°F for an hour creates edge-to-edge perfection that’ll make you wonder why you ever grilled.
Salmon at 115°F for 45 minutes is nearly impossible to mess up.
What’s great about sous vide is batch scaling—once you’re comfortable, you can cook multiple pork chops at 140°F simultaneously or prep a week’s meals in one go.
Trust me, there’s something magical about pulling perfect food from that water bath every time.
This precision is built on precise temperature control that keeps flavors and textures intact.
Essential Sous Vide Finishing Techniques for Perfect Results
Once you’ve mastered the time and temperature fundamentals, it’s time to address what many sous vide beginners overlook—the finishing touches that transform good food into restaurant-quality dishes.
For steaks, I’m obsessed with proper crust formation. I always pat my meat dry (seriously, don’t skip this!) before dropping it into a screaming-hot cast-iron for a quick pan sear—just about a minute per side.
Proper sealing sets the stage for even cooking in sous vide vacuum sealing.
For pulled pork tacos, I’ll finish them at 350°F for 30-45 minutes to get that beautiful exterior texture.
You know what’s made the biggest difference in my cooking? Adding finishing sauces right at the end.
Try a Dijon cream with salmon—it’s a game-changer.
And don’t forget to let your meat rest briefly after searing. The juices need a moment to redistribute, trust me.
Common Sous Vide Mistakes and How to Avoid Them
The mistakes I see beginners make with sous vide cooking could fill a cookbook—and I’ve made most of them myself! Let me share some common pitfalls that’ll save you time and frustration.
For heavy-use setups, prioritize models with durable, stainless steel construction stainless steel to withstand daily sealing tasks.
| Mistake | Consequence | Solution |
|---|---|---|
| Poor bag sealing | Air leaks causing uneven cooking | Double-check seals; use water displacement method |
| Wrong temperature | Missed target doneness | Research proper temps for each protein |
| Skipping the sear | Bland, pale exterior | Finish with blazing hot, quick sear |
| Improper timing | Safety risks or texture issues | Follow pasteurization guidelines, especially for poultry |
I’ve learned that proper bag sealing is absolutely critical—nothing’s more disappointing than finding your beautiful steak floating in a watery bath! Trust me, taking an extra minute to guarantee there are no air pockets will dramatically improve your results.
Frequently Asked Questions
What Are Common Sous Vide Mistakes?
I’ve seen 70% of beginners skip equipment calibration, leading to temperature drift. Common mistakes include improper sealing, skipping preheating, overcrowding the bath, and forgetting to pat dry before searing.
How to Use Sous Vide for Beginners?
I’d recommend starting with eggs or chicken breasts. You’ll need temperature charts for doneness targets and timing basics to understand how long food needs to cook. It’s surprisingly simple once you begin!
What Is the Downside of Sous Vide?
Time is money with sous vide. I’ve found the equipment cost can add up quickly, while the lengthy cooking times aren’t ideal when I’m hungry and want dinner now.
What’s the Best Meat to Sous Vide?
I’d recommend chicken breast or pork chops for beginners like you. They’re forgiving at 140-145°F for 1-4 hours. Once comfortable, try beef cuts like ribeye at 129-131°F for amazing results.