I’ve been cooking sous vide for years, and I still remember my confusion when I first heard about “water bath cooking.” It’s actually “sous vide,” not “suisse vide” (though that’s a common mix-up!). I think it’s revolutionized my home kitchen—imagine perfectly cooked steak every time without hovering over the grill. The beauty lies in its simplicity: precise temperature control means you can’t really mess it up. Ready to discover why chefs consider this their secret weapon?
What Is Sous Vide? The Water Bath Cooking Method for Perfect Results
Have you ever wondered how top chefs create those perfectly cooked steaks that are edge-to-edge pink with no gray band?
It’s all about sous vide cooking, a technique I’ve grown to love for its foolproof results.
This approach also benefits from vacuum sealing to boost heat transfer, delivering precise temperature control.
Sous vide (which means “under vacuum” in French) has fascinating history origins dating back to 1970s France.
Chef Georges Pralus discovered it, and well, it’s been transforming professional kitchens ever since.
What makes it special?
You seal food in a pouch—creating vacuum effects that intensify flavors—then cook it in a precisely controlled water bath.
I think it’s brilliant because the temperature, not timing, determines doneness.
Your food cooks in its own juices, so nothing dries out.
For beginners like you, it’s the most forgiving cooking method I’ve found.
Trust me, you’ll get restaurant-quality results every time!
The Essential Sous Vide Equipment: What You Need to Get Started
When diving into sous vide cooking, what essential equipment will transform your kitchen into a precision cooking lab?
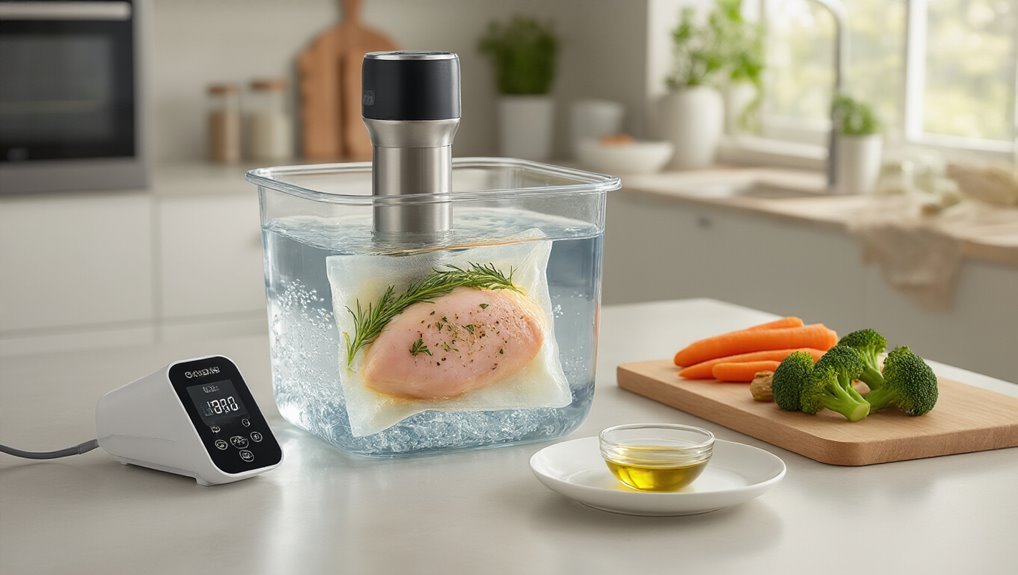
At the heart of this method is an immersion circulator that maintains exact water temperature.
The immersion circulator isn’t just a tool—it’s the precise conductor orchestrating your sous vide symphony.
I’ve found that while premium brands like Anova and Joule offer fancy features, mid-range options work just as well for beginners.
Price considerations vary wide ly—you could spend $70 or $300, depending on what bells and whistles you need.
You’ll also need a sturdy pot or container with a lid to prevent evaporation.
And food-safe bags that can withstand heat.
While vacuum sealers give the best results, honestly, the water displacement method with ziplock bags works fine when you’re starting out.
In my experience, it’s better to invest in a quality circulator first, then upgrade your other equipment as you go.
A key benefit is temperature control, which underpins even cooking and flavor infusion.
Your First Sous Vide Meal: Step-by-Step Beginner’s Guide
Once you’ve mastered these basics, you’ll be amazed at how quickly you can build up your repertoire – trust me, within weeks you’ll be experimenting with everything from 72-hour short ribs to perfectly custardy egg bites!
As you grow, you’ll appreciate how essential temperature control and precise timing are to consistently tender results.
Essential Equipment Checklist
Before diving into your first sous vide cooking adventure, you’ll need to gather some essential equipment.
I always start with a reliable immersion circulator—these clever devices control water temperature precisely while ensuring proper circulation.
Make sure you’ve got a stable power supply and think about cable management to avoid kitchen hazards.
You’ll need a heat-safe container large enough to fully submerge your food.
In my experience, a large pot works fine for beginners, though dedicated containers are worth considering later.
For sealing, I recommend a vacuum sealer if possible, but honestly, the water displacement method with high-quality resealable bags works well too.
Just verify they’re BPA-free and heat-safe.
Wait, almost forgot—a good thermometer is essential for verifying those final temperatures.
Safety first!
Simple Starter Recipes
The journey into sous vide cooking begins with simple, foolproof recipes that showcase this method’s magic.
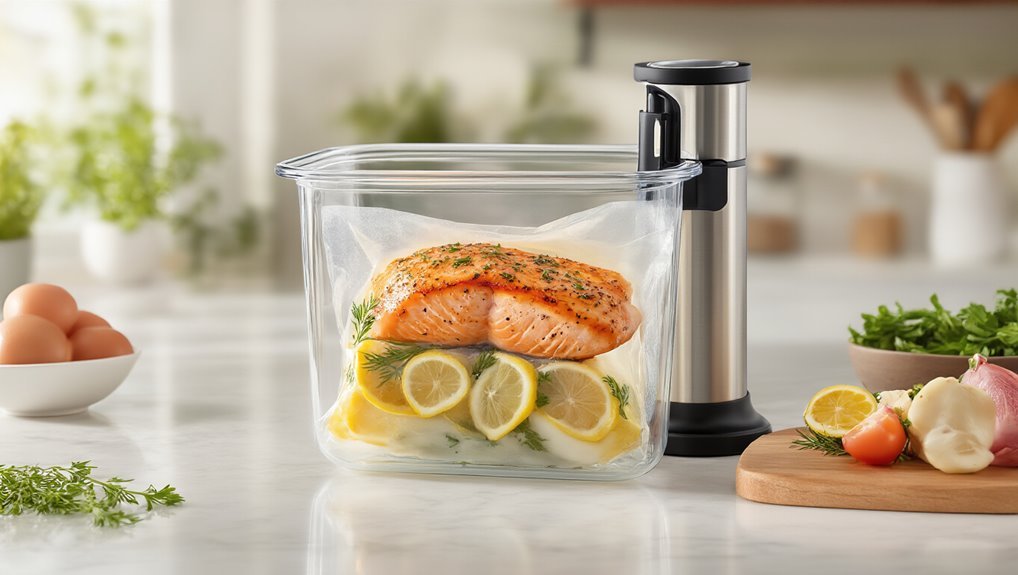
I’ve found salmon to be an ideal first project—just season it, bag it, and cook at 122°F for about 40 minutes.
The result? Perfectly silky texture that’ll make you wonder why you waited so long to try this!
For budget options, consider beef tenderloin with port wine and garlic or maybe French dip sandwiches, which transform even inexpensive cuts into restaurant-quality meals.
What I love most about sous vide is the flexibility—your cooking window is generous, so timing doesn’t have to be, um, perfect.
This gives you freedom for flavor experiments without stress.
After the bath, just finish according to recipe guidelines and enjoy!
Is Cooking in Plastic Safe? What Science Says About Sous Vide
Many health-conscious home chefs wonder about the safety of cooking food in plastic bags when using sous vide methods.
I’ve researched this concern extensively, and the plastic ethics question isn’t as worrying as it might seem.
Modern sous vide bags are specifically designed for high-temperature cooking and are typically BPA-free, though I always double-check packaging to be sure.
Chemical migration is minimized because sous vide temperatures stay well below boiling point.
I find that using quality freezer bags with proper sealing techniques creates a safe cooking environment.
If you’re still concerned—and I totally get that—you can try glass canning jars for some recipes.
In my experience, the key safety factors are using appropriate bags, ensuring airtight seals, and following manufacturer guidelines.
Don’t leave bags partially exposed to heat longer than necessary.
This is why opting for BPA-free options helps reduce exposure risk during long cook times.
Mastering Time and Temperature: Simple Charts for Different Foods
I’ve found that understanding the relationship between time and temperature is absolutely critical when you’re trying sous vide for the first time.
Vacuum sealing enhances flavors, shelf life, and meat quality vacuum sealing.
You’ll want to keep a simple chart handy that shows the exact temperature thresholds for different foods—I recommend starting with salmon at 122°F for that perfect silky texture that’s both safe and delicious.
Once you’re comfortable with the basics, you can start experimenting with different doneness levels for your favorite proteins, but always stick to proper food safety guidelines which, trust me, will save you from some potentially unpleasant experiences.
Time-Temperature Pairing Essentials
Mastering time and temperature pairings transforms ordinary ingredients into perfectly cooked meals that’ll impress even your foodie friends.
I’ve found that temperature variance is the key driver here—it’s what actually sets the doneness level, while time influences texture development.
When I cook salmon at 122°F, I aim for about 40 minutes.
This doneness mapping creates that silky texture I love, where it flakes perfectly but doesn’t taste fishy.
For beginners, I always recommend starting with trusted guides like Visual Cooking Guides or, well, ChefSteps.
They’ve done the testing for you!
And here’s the best part—once you hit that target temp, you’ve got a flexible window where your food stays perfectly cooked.
No more panicking about precise timing!
Critical Doneness Thresholds
Why do so many home cooks find themselves confused about when their food is actually done?
In my experience, it’s because traditional cooking relies on imprecise cues like color or firmness.
Sous vide completely changes this approach.
The beauty of sous vide is that temperature precision becomes your best friend.
I cooked salmon at exactly 122°F last week, and the silky texture was miles better than my usual overcooked fish.
You’re literally setting the doneness thresholds by choosing the water temperature.
What I love most?
The flexibility.
Once you hit your target temperature, most proteins can hang out in the bath for quite a while without quality loss.
It’s like, well, having a kitchen assistant who’ll hold your food at perfect doneness until you’re ready.
Food Safety Guidelines
Safety becomes paramount when cooking with sous vide methods, especially for beginners venturing into this precise world of temperature-controlled cooking. I’ve found that following time-temperature charts isn’t just about doneness—it’s essential for eliminating potential pesticide residues that might linger on foods.
When I started sous vide cooking, I was nervous about plastic safety. Trust me, using BPA-free pouches or glass jars makes all the difference.
And don’t forget about cross contamination! Unlike traditional methods where we might use the same tongs for raw and cooked foods, sous vide requires strict separation.
My favorite example? Salmon at 122°F for 40 minutes.
It’s foolproof, safer than traditional cooking (which, let’s be honest, I’ve definitely overcooked before), and results in this incredibly silky texture that’s worth every minute of the wait.
Finishing Your Sous Vide Creations: Searing, Sauces, and Serving
Bringing your sous vide creations to their delicious finale is where the real magic happens. After achieving that perfect internal temperature, it’s time to think about sauce pairings that’ll complement rather than overwhelm your dish. I’ve found that adding sauces post-cooking preserves the concentrated flavors trapped in the bag during the sous vide process.
The perfect sous vide finish isn’t just cooking—it’s revealing flavors through thoughtful sauce pairings added at exactly the right moment.
For plate presentation, I always recommend highlighting the precise doneness of your protein first, then adding finishing touches.
You know how the Teriyaki Salmon and Beef Tenderloin with Port Wine recipes work as great templates?
Well, they’re not just recipes—they’re blueprints for balancing flavor profiles.
Season before sealing, but save those show-stopping glazes and reductions for the end.
This way, you’ll enhance both texture and aroma without risking that perfectly cooked interior you worked so hard to achieve.
Remember that maintaining precise temperature control throughout the process helps ensure consistent outcomes across different desserts.
Best Foods for Beginners: Foolproof Sous Vide Recipes to Try First
The sous vide method opens up a world of culinary possibilities, but I’ve found that starting with the right recipes makes all the difference for beginners.
I’d recommend trying Sous Vide Teriyaki Salmon first – cooked at 122°F for 40 minutes, it develops incredible flavor pairings without any fishiness.
Or maybe French Dip Sandwiches, where the precise temperature control guarantees tender beef every time.
One of my favorites is Beef Tenderloin with Port Wine and Garlic – talk about perfect flavor pairings!
The best time trick with sous vide is that you can’t really overcook anything.
Actually, you can, but the window is much wider than traditional methods.
These recipes are ideal for make-ahead meals too, which is why I think they’re perfect first attempts for anyone new to sous vide cooking.
Understanding the history—originating in the late 1960s for industrial preservation and evolving into a staple for home cooks by 2010—helps explain why this method delivers reliable results with precise temperature control.
Beyond Cooking: Storing, Reheating, and Meal Prepping Sous Vide Foods
One of my favorite aspects of sous vide cooking extends well beyond the initial meal preparation.
This method also supports waste reduction by maintaining flavors and nutrition over time through extended shelf life.
I’ve found that proper storage techniques transform this cooking method into a powerful meal prepping system.
When I’m batch cooking, I use labeling systems that include both the contents and cook date—this makes rotation strategies much simpler when I’m grabbing something from the fridge.
Organization is key in sous vide meal prep—label everything with contents and dates for seamless rotation in your weekly cooking system.
- Use BPA-free pouches for both cooking and storing—they’re safer when reheating
- Cool foods completely in their cooking bags before refrigerating to maintain food safety
- When reheating, always use the original cooking temperature to avoid overcooking
You know what’s great? I can prep an entire week’s worth of proteins on Sunday, then just reheat exactly what I need each night. It’s honestly changed my weeknight dinner routine completely.
Frequently Asked Questions
Can Sous Vide Cooking Be Used for Desserts?
Yes, I’ve found sous vide perfect for desserts! I control dessert textures precisely—from silky custards to perfect cheesecakes. It’s amazing for flavor pairing, infusing ingredients gently without burning delicate components.
Does Sous Vide Work With Frozen Foods?
Yes, I can sous vide frozen foods! I’ll need to make time adjustments, adding 50% more cooking time. The frozen texture transforms beautifully as it thaws during the process.
How Much Electricity Does a Sous Vide Machine Consume?
Like a gentle sip from your outlet, my sous vide machine’s power draw is modest—typically 800-1200 watts while heating, then dropping for energy efficiency during cooking. Most use about 1 kWh daily.
Can You Sous Vide Multiple Different Foods Simultaneously?
Yes, I can sous vide multiple foods simultaneously through batch coordination. I need to plan carefully, ensuring timing synchronization between items that require different temperatures or cooking durations.
Does Altitude Affect Sous Vide Cooking Temperatures?
Yes, altitude does impact sous vide cooking. At higher elevations, water’s boiling dynamics change, lowering the boiling point. I’ll still set my circulator to the same temperature, though, since it measures actual water temperature.